We have revamped Groups to allow you to easily override the default room type defined at Service setup.
The new Group Override functionality introduces the following features:
- For an Accommodation booking, manage Default Options Types at Itinerary, or by Booking line.
- You no longer require a single default Accommodation option throughout your database. Thus, you can base your per person pricing off Twin rooms as well as Double rooms in an itinerary.
- All existing Pax break functions are maintained. The new Groups override for Room type is an extension of the existing groups functionality.
Join Alper for a webinar on our new Groups Override functionality. To start using Groups, ensure your database is set up for Groups. If you are uncertain, please contact our friendly Support team or get in touch with your Customer Engagement Manager.
Setting up Groups
Begin your Groups set up by setting up passenger breaks. Bookings tab now displays the new Groups Override field.
Introducing the Group Override field
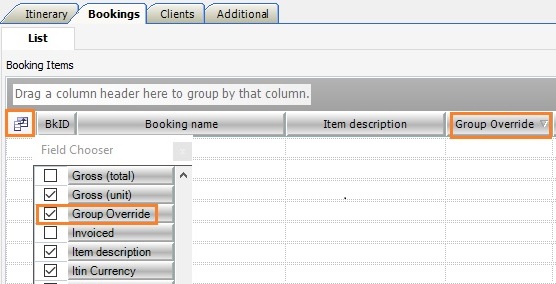
The Groups Override field lets you define which Room Type your per person pricing should base off. This field needs to be enabled via the Field Chooser.
Note: If you do not see the Group Override column within the Field Chooser of your database, the feature may be disabled on your database. Please reach out to us, and we will enable the Group Override feature for you.
- Enable the Group Override field in the Bookings tab by selecting the Field Chooser
 in the top left corner of the Bookings tab and tick the Group Override field.
 - Adjust your column headers. Drag the unused columns to the top to temporarily disable them from the Bookings tab.
The field lets you select your Groups default option. Before you get to that, setup passenger breaks in the Groups setup window. Let’s see how.
Tourwriter Groups Setup window
The Groups setup window or the Pax Break window is where you configure each travelling group. By setting up Passenger Breaks, you’ll be specifying the number of Adults, Children and Staff.
- On the Bookings tab, select Tools > Setup group configuration to open the Tourwriter Groups Setup window.
- Base your per person pricing off either Gross price or Net price from the dropdown.
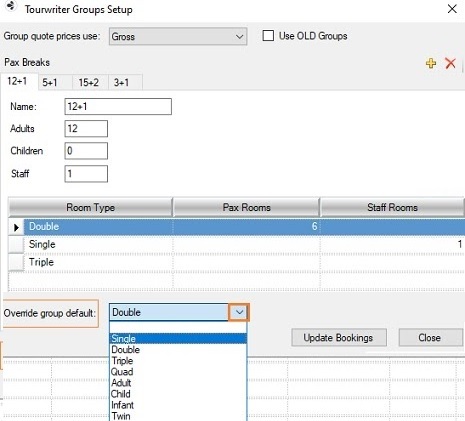
- Select your default option type from the Override group default dropdown. The dropdown lets you select the default Room Type your per person pricing will base off. This ideally is the most used/sold Option Type. For most, this is the Double or Twin configuration. dropdown.
- The Groups setup window displays the Group Default column to select a default at the setup. The Group Default column corresponds to the Group Override field on the Bookings tab.
- Enter a group name in the Name: field. The Group name in the example above correlates with the number of Groups passengers.
- Add values in the Adults, Children and the Staff fields to calculate per person price for the pax breaks. The Staff’s cost is covered by all the paying passengers.
Tip: To ensure the Room Types are copied to all Groups, create all your Pax break groups before you add the Room Types.
- To add a Room Type, click
 in the bottom half of the Groups Setup window. Select from a list of options that can be configured under Tools > Setup > Option configs.
Note: It is a good practice to enter Room Types for all Accommodation services you require Supplement or Reduction pricing for. This means enter all Room Types that accommodate the same count of occupants. For instance, if the Service to add to an itinerary has a Single and a Twin room, add a Double Room Type to the Groups Setup window. Doing so will allow you to switch your default override between the Double and Twin Room Types without affecting the calculation. Additionally, you can keep your per person price calculation intact even if you select both Twin and Double as your default override.
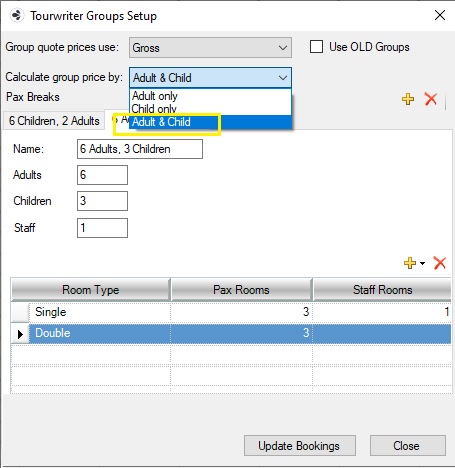
The Calculate group price by dropdown
In group tours, sometimes the tour staff participates in certain services without paying for them. In previous Tourwriter versions, you could divide the staff’s cost amongst the paying adult passengers only. However, in some scenarios, the price for staff must be covered by children who are part of the itinerary. An example is an itinerary for a school trip. The new Tourwriter version lets you divide the staff cost amongst any one of the following pricing options: Adult, Child or both.
The Groups setup window now comes with the new Calculate group price by dropdown. There are 3 dropdown options that correlate to ways the staff pricing can be divided:
- Adult only
- Child only
- Adult & Child
Let’s look at scenarios where we’d be needing each.
The Adult only option
Entering the number of staff in the Staff column adds to the overall service price. Previously the staff’s cost was divided with the number entered in the Adults column, as shown in the example below:
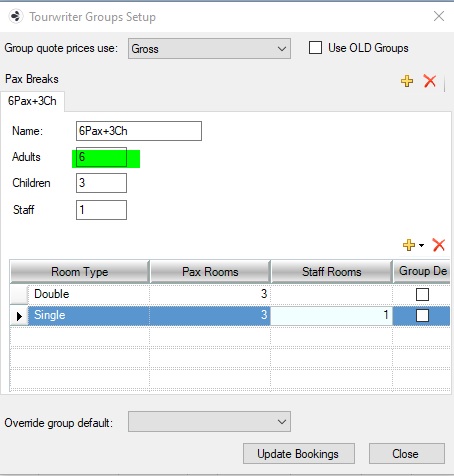
In the screenshot above, the cost of 1 staff participating in the service is divided amongst 6 adults. The cost is not shared between the 3 children added to the Children field.
The Child Only option
The Child only dropdown option is ideal when the itinerary is for a school trip. For this option, the cost of the staff (tour guides) and adults (teachers and school staff) is divided amongst the paying children.
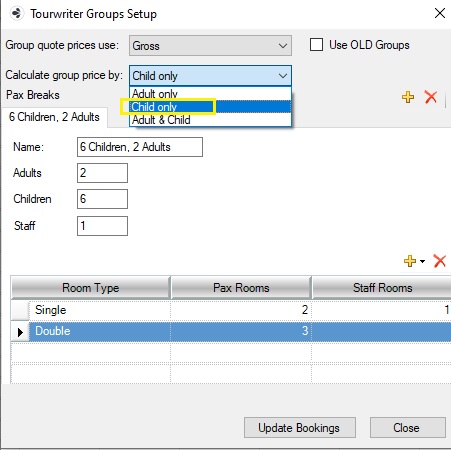
When the Child only option is selected, the staff cost is divided by the value specified in the Children field. In the example above, the cost of a single staff is divided among 6 children.
The Adult & Child option
The Adult & Child option is used when the adults and children partaking in the trip pay for themselves. When on a school trip, if the children (students) and adults (school staff) pay for themselves and decide to share the cost of the staff (tour guide), you can choose the Adults & Child option.
When the Adult & Child option is selected, the staff cost is divided by the sum of the values in the Adults and Children fields. In the example above, the cost of 1 staff is divided among 6 adults and 3 children, i.e., 6+3 = 9.
Adding Bookings to a Group Itinerary
Adding bookings to a Groups Itinerary is no different from adding bookings to any other itinerary. The two ways to add bookings to an itinerary are:-
- Drag and drop the Supplier from the Supplier menu. Or
- Search for a Supplier by clicking the on to the top-right corner of the Bookings tab.
Visit the Adding Bookings article for more information.
However, unlike other itineraries, there are factors to consider when adding bookings to a Groups itinerary.
Constraints with the Group Override Functionality
Even though the new Groups override feature comes with a lot of enhancements, there are a few limitations and constraints.
Selecting the correct Option Types
To start using groups, make sure your database is set for Groups. To verify that, open a Supplier, switch to the Services tab and click the View dropdown then select (tick) Groups. The following should happen:
- A Charge field appears under Services.
- A Type dropdown field displays under Pricing options for the highlighted season.
- A Default checkbox field appears under Pricing options for the highlighted season.
The new Groups Override feature works with 3 Charge types, namely Group, PAX and Room. Here’s a table that lists the differences between the three.
PARAMETERS | GROUP CONFIGURATION TYPES | ||
Group | PAX | Room | |
Key Service Types used for | Coachlines, Coach Car, Rental Car | Activity, Breakfast | Accommodation |
Option examples | 11 Seater (Based on the available seats) | Adult, Child | Double/Twin, Single, Triple, Quad |
Price Calculations | The total price of the service divided amongst all the group members | The price of the service is charged to each person in the group. | The charge depends on the room type. |
Option Settings when setup for Groups | 1) Option Type field to be left blank. 2) All rows to be ticked as Default | 1) Option Type to match the option name, i.e. Adult, Child... 2) Only one row ticked as Default that defines the per person pricing | 1) Option Type to match the option name, i.e. Double, Single, Triple … 2) Select Default that you base your per person pricing off |
The table above summarises the following:-
- For a Service with a Charge Type Group, all the Option Types selected should be marked Default.
- A service with Charge Type Pax, one of the Option Types between Adult and Child must be marked Default.
- A Room Charge Type should have the Default set to the Option Type that the per person pricing will base off.
When you add bookings to a Groups itinerary, the Option Type and Default preference for each Booking should adhere to the rules stated above. If your bookings do not adhere to the Groups Configuration rules, you will see Warning messages. Here are a few examples of ways to add Services to a Groups itinerary incorrectly.
- For an Accommodation type, selecting a Room with no Default generates the following warning.

Note: You will also see the warning message above if you do not select all rows as Default for a Service with a Group Charge Type.
- Adding a Room with no Option Type result in the following pop-up.

- Similarly, adding a Service with a Group Charge Type that does not have a blank Option Type also results in a pop-up.

Warning – Assigning different Booking IDs to Bookings from the same Service
The Groups Override feature expects Bookings from the same Service to have the same Booking ID so that the per person pricing calculates correctly. You will see an incorrect Supplement or Reduction price when bookings from a Service are assigned different Booking IDs while they are added to the itinerary. A warning pops up when you assign a new Booking ID on the Booking Window. Let’s look at a scenario.
- Drag and drop a Supplier onto the Bookings tab. Or click the to open the Add new booking popup window.
- Select an Accommodation Service to auto-select all the Room types configured in the Group setup.
- Untick the Auto-assign New BkID checkbox to ensure the per person calculations are correct. A Warning message pops up if you book the rooms without clearing the checkbox
- Fill up the Time, Nts/days and the Qty fields in the lower grid of the window.

Note: Once added to the itinerary, you may manually split Bookings that have the same ID. See Split Bookings – Renaming Booking IDs for more.
Sorting the new columns on the Booking tab
After you add Bookings to your itinerary, you may have to reset the grid layout on your itinerary. Go to Tools (from Bookings tab) and select Reset grid layout. You may also reset the layout for the whole database through the My Account Details section. (click the link to learn more)
After setting up pax breaks and adding bookings to the itinerary, extra columns appear on your Bookings tab.
- Scroll to the right of the screen to find the new columns.
- Arrange columns as you would like to view them. You could move unused columns to the far right. The new columns are the Passenger Break listed as a field.
- Hover over the column name to view the complete Pax Break name. Along with the Pax Break, each Room Type ( i.e. Double, Single, Triple…) added in the Group configuration appears as a separate column.
- Pricing shown in these new columns is for any Supplements or Reductions.
- Whereas the Pax Breaks Columns (e.g.. 14 passengers + 1 escort] display the price per person for your Default Room Type option, in addition to any costs for FOC staff.
- Thus, if, for instance, you have chosen Twin as your Default option, it won’t be listed as a column in the Bookings tab.
Override Itinerary at Booking line
You are also able to force each Booking line to be included in Pax Break calculations. For example, the Groups Override Default in your Itinerary is defined as Double, but a supplier only has Twin rooms. You can select the Twin service by clicking the appropriate Group override box. Let’s look at a scenario.
In the example above, the user manually enables the Twin Booking as the Default via the Group Override column. Thus, a user can choose services to be included in the Pax Break calculation at the itinerary level.
Refer to the Groups Operations Overview article for steps on adjusting the breakdown costs for each booking line, adding a Markup to your Groups itinerary and adjusting the Groups passenger list.
For instructions on adding passengers and assigning room numbers to a groups itinerary in the latest Tourwriter version, please refer to Adding passengers & assigning room numbers.