This video outlines the operational steps required to finalize a Group booking. You will learn how to add or remove room types, update booking quantities, add your passengers and send rooming lists to suppliers. If you wish to learn about the new Groups Override functionality, refer to the Introducing the Groups Override function article.
Once you have set up your Pax Breaks and added bookings to your Groups itinerary, you can adjust the breakdown costs on each booking line in the Quote Panel. And later, you can add a Markup to the Group itinerary, finalise the room quantity and modify the number of passengers. Let’s go through the detailed steps to do that:
Adjusting the Breakdown of each Booking Line
You may want to go through the breakdown for each group and verify the correct purchase item price with the corresponding group. To do that, adjust the breakdown of each booking line.
Accessing the Quote Panel
The Quote Panel lets you scroll through each booking and cross-check prices for each booking. The Panel further lets you view the breakdown for the Staff and the FOC costs.
- On the Bookings tab of the itinerary, navigate to Show > Details. This opens the Quote panel. This option appears beside the Tools menu in the Bookings List tab
- Click through each Booking to see the line breakdown.
Note: Scroll to the right on your Bookings Panel to view all the columns.
In the example above, you’ll see that when you click through each Booking row, the cost details for that booking appears in the Quote panel. In the Quote panel, scroll through each Group (Pax break tab) to view the breakdown cost, the Staff cost and the FOC charges, if any.
- Keep the buses/transport bookings enabled for the groups that have booked them and disable it for the rest of the Groups. Highlight the booking and click Disable to disable the booking, thus ensuring each Group is charged the correct price.
In this example, as the 19-28 pax coach will be used by the 5+1 and 3+1 group, we disable it for the 12+1 and 15+2 Groups. Similarly, we disable the 29-35 pax Coach for the 5+1 and 3+1 Group.
- Adjust the price owed by FOCs or staff, who’d be participating in certain services but not be paying for it.
Note: Entering the number of staff participating in the Staff column does not add a price against them.
- If you have a Staff travelling but not participating in certain Services, then you can update the ‘Staff’ number to ‘0’ in the detail window, under Related Bookings section.
Tip: Remember to update each Pax break tab to correctly calculate the prices displayed.
Adding a Markup to a Group Itinerary
You may want to add a commission rate or a markup to the per person pricing in a Groups itinerary. To do that:
- Select the Tools (top right of the Bookings tab) > Override Itinerary Pricing option in the Bookings tab.
- You can either add a percent markup value against the Markup % row for each column or add a roundup figure for the Subtotal row by entering a final value against the Override $ field for each column.
- To view the Pax Break overrides navigate to Show > Overrides in the Bookings tab.

Finalising the Itinerary Passengers
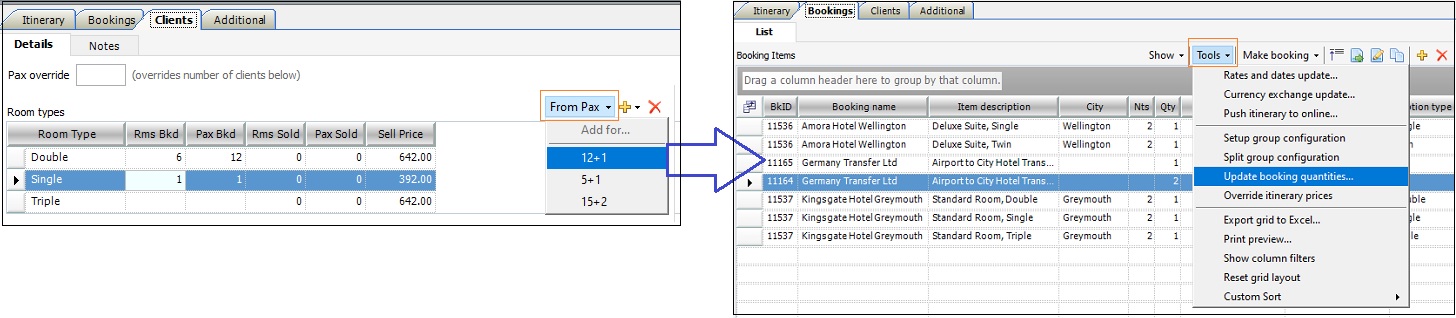
- In the Clients tab of the itinerary, choose the Pax Break finalised for the group by selecting it from the From Pax dropdown menu. It populates the Room Types, Rooms Booked and the Price for each Room Type in the Room Types grid.
- Amend numbers if they now differ from original configuration setup.
- If the Room Types have changed since the Pax Break Setup, follow these steps:-
- Go to the Clients Tab to delete any rooms not required from Room types grid
- Go to the Bookings Tab – Tools > Setup group configuration. Delete rooms not needed from the lower grid.
- Click Update Bookings.
- Select Remove Bookings for Unnecessary Room Types.
- Go to the Bookings tab – Tools > Update Booking Quantities to update the quantities based on numbers in Room types grid in the Clients tab.
Note: For instructions on adding passengers and assigning room numbers to a groups itinerary in the latest Tourwriter version, please refer to Adding passengers & assigning room numbers.
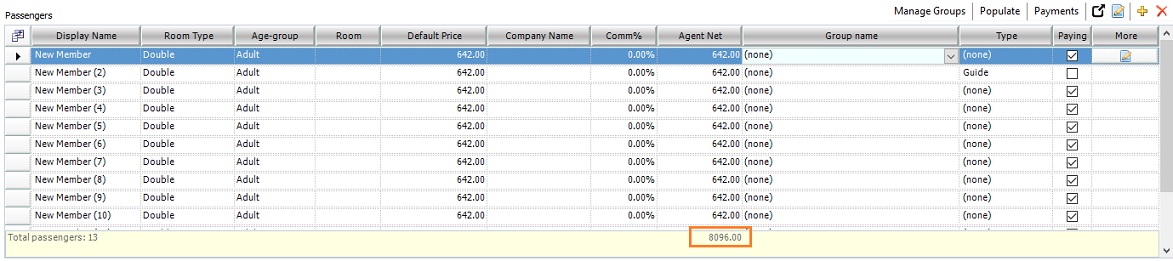
Enabling the Agent Net column
You can enable the Agent Net column from the field chooser in the passengers grid. The total shown in the Agent Net column (bottom) is the total value you should expect to receive for this Group Itinerary
- You may enter the total Agent Net from the Passenger List to the Final Sell Price area of the Bookings list.