The new Split Group feature is designed to let you handpick travellers participating in a booking activity. You can automatically split the cost of the booking among paying passengers. We’ve also introduced a new way of assigning a traveller to a Group.
Setting up Groups at the Supplier level
As seen with the Passenger Breaks feature for Groups, the Service pricing option for a Supplier needs to be set up initially to include Group pricing. In the Services tab of the Supplier, click View > Groups to enable groups. Enabling Groups defines the charge per service. To know more, go through the Enabling Groups section of the Services Tab Overview article.
Accessing the Split Group Interface
To set up split groups in Tourwriter, you need to access the Split Group Interface.
- Navigate to the Bookings tab of an itinerary.
- Select Tools > Split group configuration to open the Split Group window.
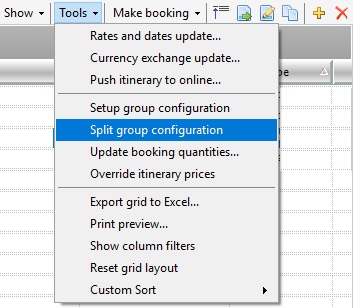
Note: For an itinerary, you can’t access the Split Group interface if you have Pax Break configured and vice versa.
- The interface displays Item Description and Booking name, Date, Time, Nts and Qty fields to the left of the window.
- The traveller names appear to the right.
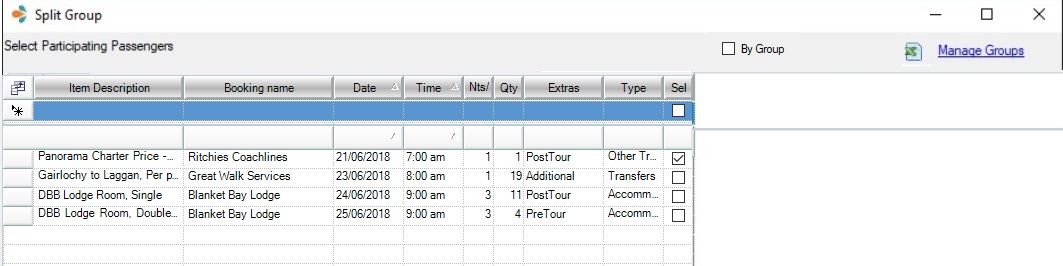
Note: The traveller information in the Split Group window is populated from the Passengers grid in the Clients tab of the itinerary. Check out the different ways to add travellers to the Passengers grid in the Details Subtab article.
Adding Group Details
You can use the Split Groups interface to add, delete and edit groups.
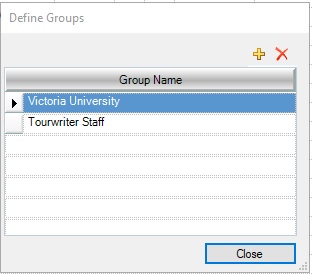
- In the Split Group interface, click Manage Groups.

- Selecting Manage Groups opens the Define Groups window where you can add groups.
- Click
 to add a group.
 - The Define Groups window lets you add, delete and edit multiple groups.
- After you finish adding groups, the drop-down under each traveller displays the recently added groups. Map each traveller to a group by choosing the group name from the drop-down list.

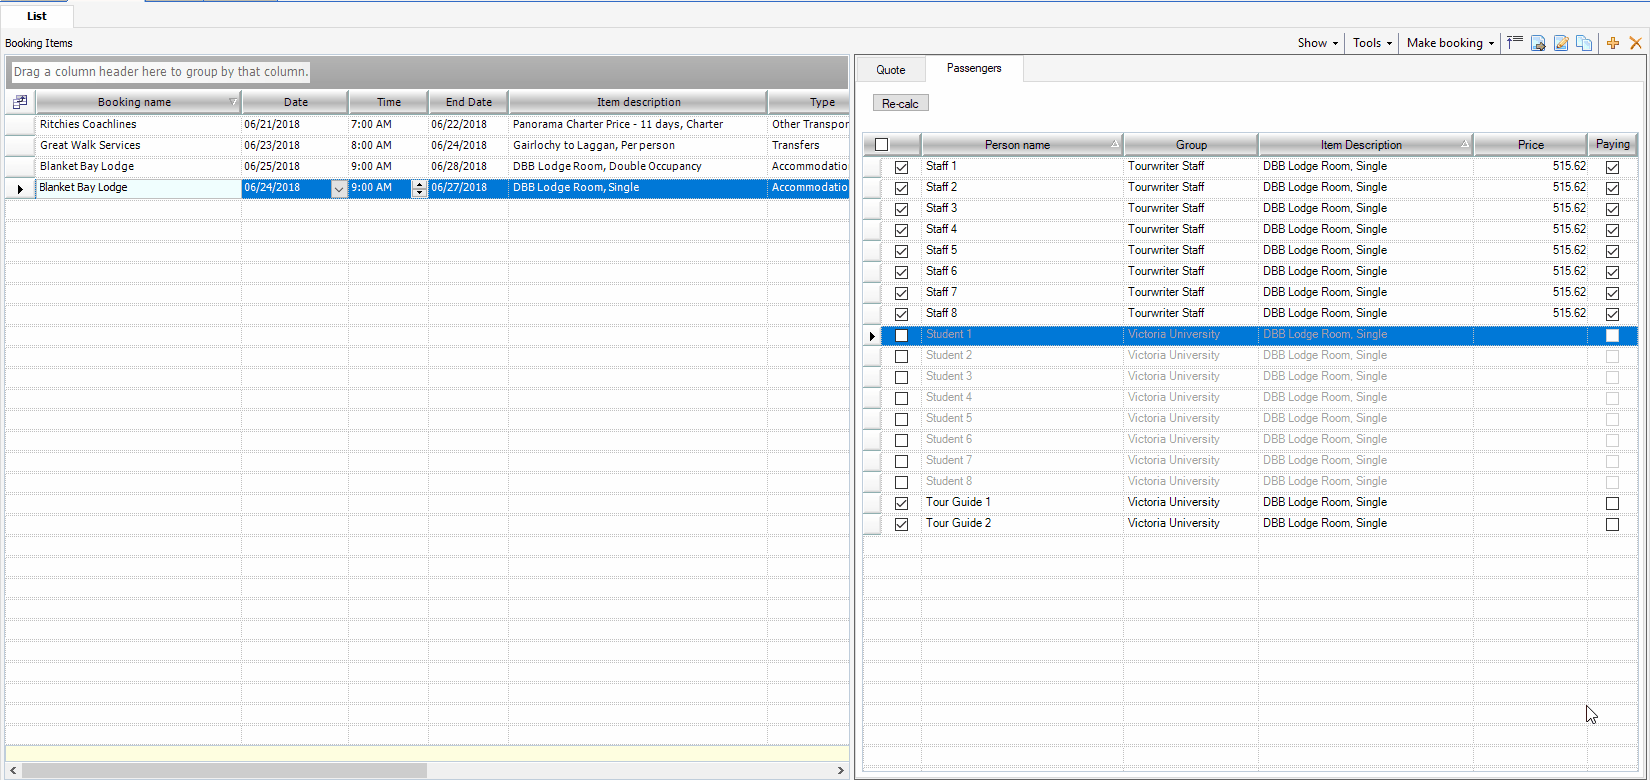
Note: In the example above, we have created an itinerary to accommodate a trip for two groups. The first group includes 8 students from Victoria University, who have opted for 4 Double rooms at the DBB Lodge. The second group contains 8 Tourwriter Staff members, each of who have chosen Single rooms at the DBB Lodge. Additionally, there are 2 Tour Guides to guide both groups. Each paying traveller will share the expense of their Tour Guide’s stay at the DBB lodge.
- The grid to the right defaults to sorting by each traveller. If you wish to sort by each group, click the By Group checkbox as shown in the screenshot below. You can untick the By Group option to revert to the original layout.

Note: In the example above, we have sorted the view By Group to display the two groups, i.e. Tourwriter Staff and Victoria University. Thus, by sorting the view by group rather than by passenger, you can configure split group pricing per group.
- Ticking the Include check-box in the interface allows you to decide whether the traveller participates in the booking item. This way the traveller is linked to a corresponding booking item.
- The Paying check-box in the interface allows you to select if the client will be paying for that booking item.
Note: As we see in the screenshot above, the Include and the Paying checkboxes against the DBB Lodge Double rooms are not ticked for the Staff members. That is because they have opted for Single rooms. The other group, University Students, has the Include checkbox ticked for the Double room. Even though the Tour Guide will be lodging, they will not pay for the room, and hence they do not have the Paying Checkbox ticked. The members of the group will share the cost of their respective Tour Guide.
- The Split Interface even comes with the Select All functionality. The Sel column lets you select multiple Include and Paying checkboxes. Ticking the checkbox under the column name allows you to include all passengers for all bookings. Ticking the box at the row level lets you include all passengers for one booking.
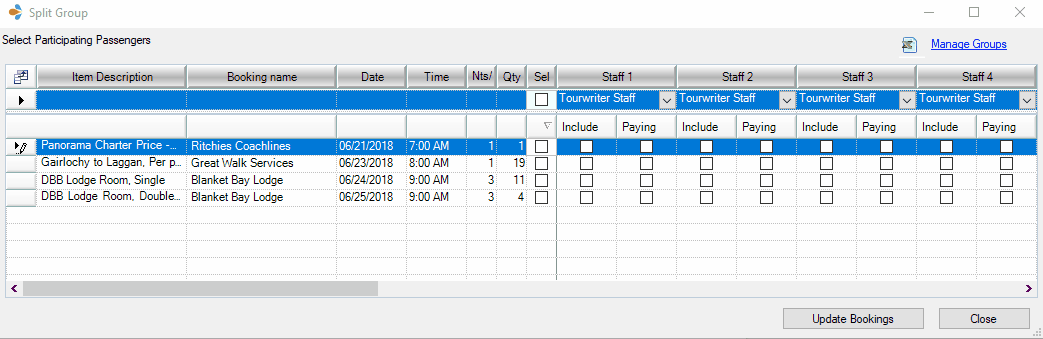
- After linking booking items to each member and choosing whether they are paying travellers, click Update Bookings. This selection maps the correct booking charge to each group. Each group appears as a column in the booking tab of the itinerary.
You can also add groups through the Passengers grid in the Clients tab of the itinerary. Clicking Manage Groups in the Passengers grid opens the Define Groups window. Once you add groups, you can choose whether they are paying travellers by selecting the Paying checkbox. You can further select the payee and the group they belong to in the Group name and the Payee drop-down.

Exporting the Split
This feature also lets you export your existing Split Group configuration to a spreadsheet.
- Click the export icon on your Split Group interface to save the sheet to your system.

- Open the spreadsheet to view the rows and fields that appear in the interface.
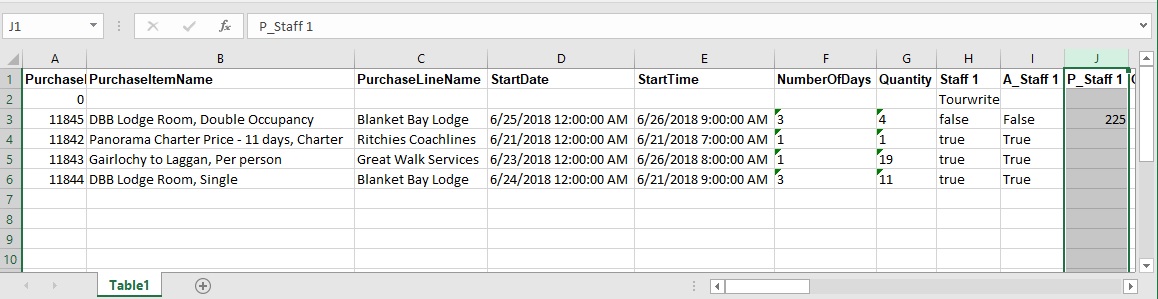
- An added column next to Paying displays the amount owed by the traveller for that booking item. In the screenshot below, Staff1 owes $225 for a Double Room at the DBB Lodge.
Modifying Group Settings in the Passengers Panel
The Passengers panel is another area where itinerary prices can be adjusted and re-calculated. This panel lets you choose whether a traveller is a paying traveller. Additionally, here you can also override the price a traveller owes.
- The Passengers panel is contextual, which means that the information in the panel column is unique to each booking item. Thus, highlighting a booking item lists information specific to that item in the panel.
- To access the Passengers panel, go to the Bookings tab of an itinerary, click Show and choose Details from the drop-down menu. The panel lists the travellers and their respective groups. It also specifies the price each traveller has to pay if they are a paying passenger.
- The Panel further allows you to override the amount that a traveller owes. Just overtype the amount in the Price column.
- You can also select if the traveller is a paying traveller by ticking the Paying checkbox against the traveller.
Note:- The settings from the Split Group interface carries over to the Passengers Panel. The travellers not selected to pay for the row are greyed out.
- Once changes for all the booking items are made, click Re-calc on the top of the panel. The changes will reflect under the Group name in the bookings tab.
Split Group Email Booking Template
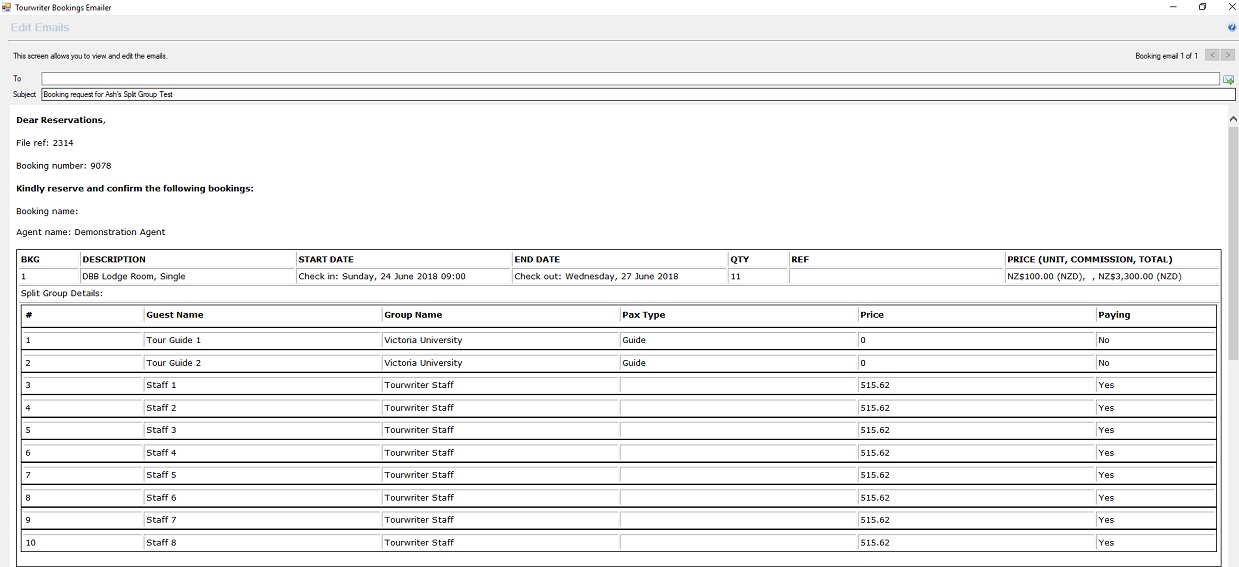
Tourwriter allows you to book your Split Group itinerary using the new Split Group Email Booking Template. The template allows you to list the travellers, the group they belong to and the amount each traveller owes. The image below shows the table the Supplier will receive once a split group booking request is sent to them:-
The Split Group Email Booking template is available to download from the following link:
Split Group Email Booking Template
Download and Save the above .html template to your TourwriterData > Templates folder. To understand how to add the Split Group Email Booking template to your itinerary, go through the How to add an additional Booking Email Template section of the Activities Email Booking Request Template article.
Sub-categorise bookings for Split Groups
You may want to design an itinerary for people who do not always travel with each other. Through Split Groups, you can achieve that. You can subcategorise services into say Pre-Tour, Post-Tour, Optional, Complementary and so on to organise your itinerary better. Split Group has a new BookingType column that does just that.
Adding a Label to the BookingType1 field
The newly introduced field for Split Groups will be labelled BookingType1 by default. The label can be modified in the Setup area.
- Navigate to Tools > Setup > Booking Labels.
- Enter a name in the Type 1 field. The name will be the column header on the Split Group window

Entering values for the field
To have drop-down options available for the Type1 field, you will have to add values in Tourwriter Setup.
- Head to Tools > Setup > Extras List. Locate the name of the recently labelled field.
- Highlight the name and start adding the List values. The values will appear as a dropdown option on the Bookings tab. Once selected, you can see it on the Split Groups window.

Assigning a Subcategory
To assign and display a subcategory to a booking, you first need to add it to the Bookings tab.
- Enable the Extras field in the Bookings List tab by selecting the Field Chooser in the top left corner tick the ‘Extras’ field.
- Choose a subcategory for each booking from the drop-down menu.
- Go to Tools > Split Groups Configuration to open the Split Groups window.
- NOTE: Even though the field is labelled Extras on the Booking List tab, the Split Groups window will display the values under the label you chose in the Booking Labels section.

Note: The newly introduced Type field on the Split Groups window displays the Service Type for the corresponding booking.