In addition to the option of handpicking travellers that participate in a booking activity, Split pricing lets you configure per person pricing along with the option to adjust staff cost pricing correctly. The Split pricing functionality builds on top of the Groups function by allowing users to define services available for passengers to consume.
Split pricing is useful for small groups tours where different family groups can have different invoices or large group tours where individual passengers opt for Pre, Post travel or additional activities. Split pricing is also well-suited if you wish to alter between per passenger or group pricing.
Let us go through the steps to get you started with the Split Pricing function.
Setting up Room types
Ensure your Suppliers are set up per Groups best practice following Enabling Groups.
Populating Itinerary passengers
Users can add a new passenger or drag and drop an existing Contact Card. For instructions to create a permanent Contact Card, refer to the Passengers section in the Default Subtab article. In this section we’ll see how to add passengers just to an itinerary:
- Navigate to the Clients tab on an itinerary and scroll down to the Passengers workspace.
- Click the
 sign to add a new passenger.
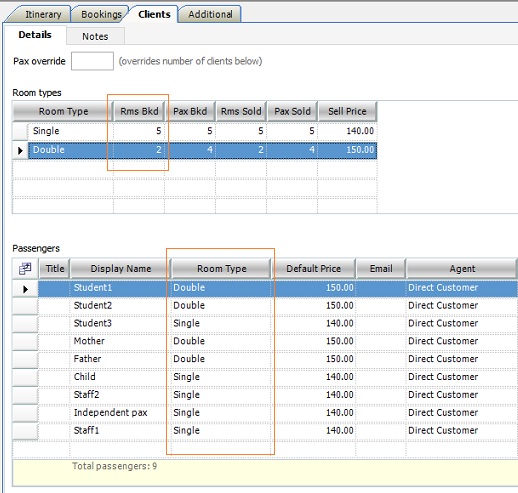
Tip: If you utilise room types to define package pricing, add them under Room types. Selecting Populate in the Passengers workspace auto-populates the number of passengers to match the Rooms Type.
- The cursor defaults to text in the Display Name column. Type over the text New Member and enter the passenger name.
- You can fill in passenger information in the optional fields, i.e. First Name, Last Name, Company, Email, Country and Age. These fields are also available to be filled through a Contact Card.
- Assign a room to each passenger in the Room Type dropdown. Confirm whether the rooms assigned match up to the value in the Rms Bkd column in Room types.
- Select the passenger type under the Type field. It is important to assign a relevant type to a Staff passenger, e.g. Driver, Guide. A Staff’s cost is split among all itinerary passengers only after selecting the correct Type value and unticking the Paying checkbox against them.
- Select whether the traveller is a paying passenger through the Paying checkbox field.
Note: Each new passenger added to the workspace is marked Paying presuming the entry is for a non-staff passenger. In practice, you may want to untick Paying only for a Staff passenger.
Accessing the Passengers panel
The Passengers panel is where you override the default Room Type and paying settings. Through this panel, you can configure Extras List. Changes made here splits the cost accordingly and prices are reflected in the Split pricing configuration window.
- Select Show > Details on the Bookings tab to access the Passengers panel. The panel lists the passengers along with the price they owe..
- The panel is contextual, meaning the information in the panel column is unique to each booking item. Highlight a booking item to display information specific to that item in the panel.
Note: The initial layout displaying the passenger’s participation correlates to the Room types chosen for each passenger in the Clients tab.
- You can change the price each passenger owes by toggling the Paying checkbox against them.
Note: A Staff’s cost is always split among all itinerary passengers. The price split only works if you untick Paying against the Staff in the Clients tab, in addition to selecting the correct Staff Type value.
Accessing Split pricing configuration
The Split configuration window lets you alter your itinerary pricing view between pricing per traveller or group. You can also use this window to override passenger prices. A non-SIC itinerary is known as Pure Split tour.
- Navigate to the Bookings tab of an itinerary.
- Select Tools > Split pricing configuration to open the Split configuration window.
Note: You can’t access the Split configuration window if you have configured the itinerary for Groups pax break and vice versa.
- The window initially pops up to display booking prices per group. Untick the By Group checkbox to view booking prices per passenger.
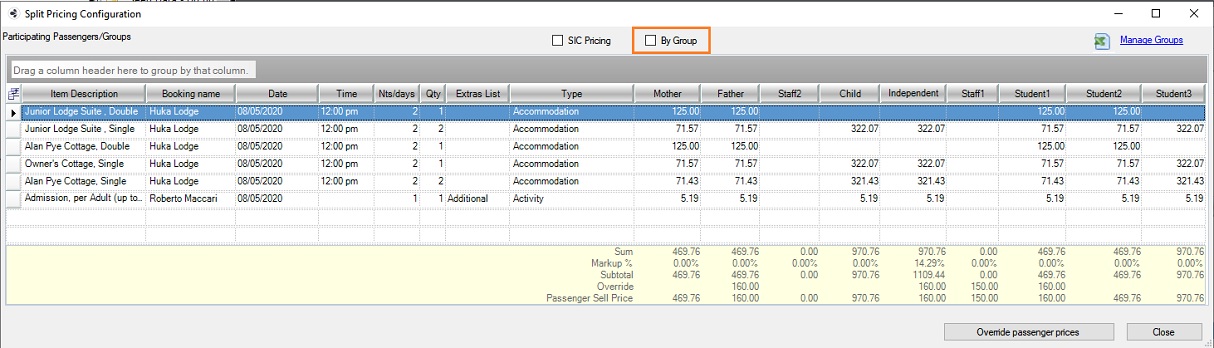
- You can select Seat-in-Coach (SIC) pricing to change the itinerary design to a Seat-in-Coach tour. To learn how to add a package price for an SIC tour, proceed to the Adding an SIC package section.
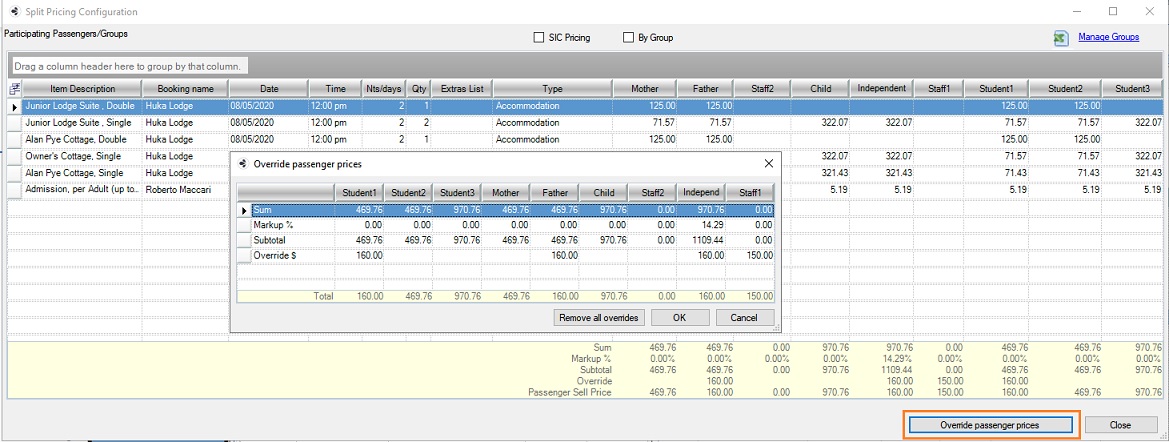
- To apply a final override to each passenger pricing, select Override passenger prices.
- You can either add a percent markup value for a passenger in the Markup % row or roundup the Subtotal amount by entering a final passenger price in the Override $ row.
- Note: The overridden price is auto-pushed to the Price Override field in the Passenger workspace under the Clients tab.
Note: You can only override per person pricing and not pricing by group. Untick the By Group checkbox to manually adjust per person price. Tick the By Group checkbox again to view the overridden final group price.
Arranging passengers in Groups
After adding traveller details to the Passengers workspace, you can assign passengers to groups. Assigning passengers to groups lets you view pricing by each group in the Split pricing window.
- Click Manage Groups at the top-right of the Passengers workspace to open the Define Groups window. The option to open the Define Groups window is also available on the Split pricing window.
- Click to add a group.
- The Define Groups window lets you modify a group by adding, deleting and editing multiple groups.

- Choose a relevant group for each passenger by selecting a value from the Group name dropdown.
- Make sure a Staff is always assigned the default group, i.e. Individual.
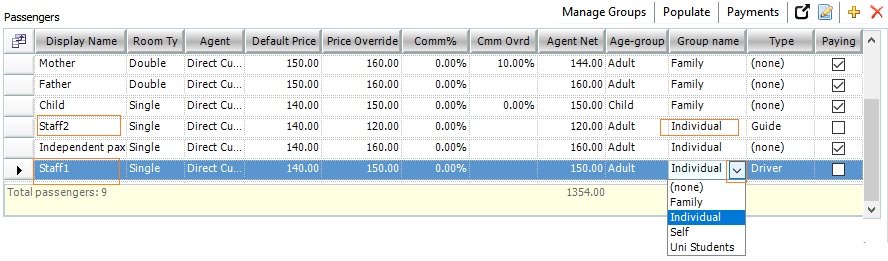
- You can choose to add independent travellers. Each passenger added to the workspace is tagged Individual. If the traveller does not belong to a group, proceed with Individual as the default group.
Note: A traveller assigned Individual is independent to other travellers with the Individual tag. Passengers showing Individual as their group are not correlated.
Adding a Package price for an SIC Tour
Tourwriter lets you define your Split pricing itinerary as either a Seat-in-Coach (SIC) tour or a Pure Split tour. The primary difference is that Pure split considers the Gross (final) price in the Bookings tab when calculating the price per traveller, while SIC considers a predefined package price. If you wish to design your itinerary as SIC, include an overridden package price for each room in Room types in the Clients tab. This is how the SIC price for each room calculates as the sum of the Sell Price and the Extras cost.
A user may choose to participate in an “Extra” activity that others don’t partake in. This is when you define the booking as an Extra. To learn more about Extras List, head to the Extras List section
Adding an SIC Package
With SIC pricing enabled, you can set a package price for each room. To set a package price:
- Make sure you have populated Rooms type under the Clients tab.
- The price in the Sell price column initially appears as 0. Add a Sell price which will also be your package price.
- To view total SIC pricing per passenger, head to Split pricing window.
- Enable the SIC pricing checkbox to observe 3 rows appearing at the bottom viz; Package Room Type, Package Price and Package + Extras.

Note: If you enable By Group, you can access SIC pricing for each group.
Price Override
You can override the Package price either in the Split pricing window or the Clients tab. We previously went through Override passenger prices in the Split pricing window. Now, let’s see how to override the package sell price in the Clients tab.
- When the Room type field is populated, the Default Price field displays the price added for each room in the Sell Price field.
- Override the price by entering a new value in the Price override field.
- The Comm% field displays the default commission. You can override this commission by entering a different percent value in the Cmm Ovrd field.
- Agent net is adjusted based on the overridden commission percentage.
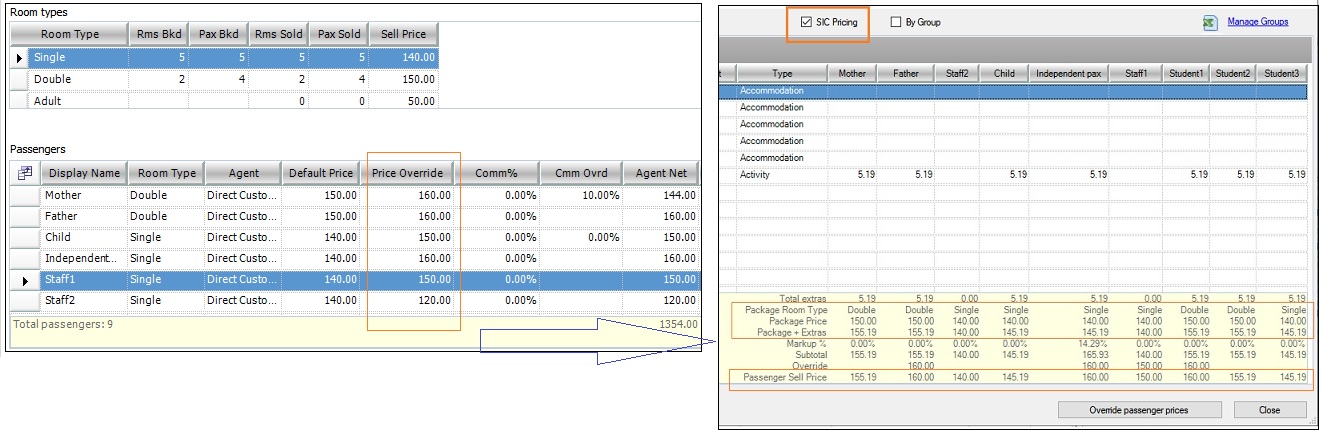
- The overridden SIC price displays at the bottom of the Split pricing window. The overridden price changes are consistent with the changes seen in the Override passenger prices window.
Extras List
You may want to design an itinerary for an independent passenger who wishes to take up additional activities. Split pricing subcategorises services into sub-tours, such as Pre-Tour, Post-Tour, Optional, and Additional to organise your Split pricing itinerary better. The Extras List column in the Bookings tab lets you achieve just that:
Accessing the default Extras List values
The newly introduced field is labelled Extras List. The label can be modified in Tourwriter Setup.
- Navigate to Tools > Setup > Booking Labels.
- The Type 1 field defaults to Extras List. The term also acts as the column header on the Split pricing window.

Entering values for the field
You can change the values that appear in the Extras List.
- Go to Tools > Setup > Extras List and highlight Extras List.
- Edit or add new List values. The values appear as dropdown options on the Bookings tab.

Adding Extras to a Booking
To associate an Extras List to a booking, enable Extras List in the Bookings tab.
- Enable the Extras field in the Bookings tab by selecting the Field Chooser in the top left corner and selecting the ‘Extras’ field.
- Choose an Extras List value for each booking from the dropdown.
- Head to Tools > Split pricing configuration to view your selection.