This Post Covers:
- The Collaboration options, what this looks like, and what it includes
- The different ways to share your itinerary with your client
![]()
At the top right of your cover photo, you will find the options to
- Invite Collaborators
- Send to Clients
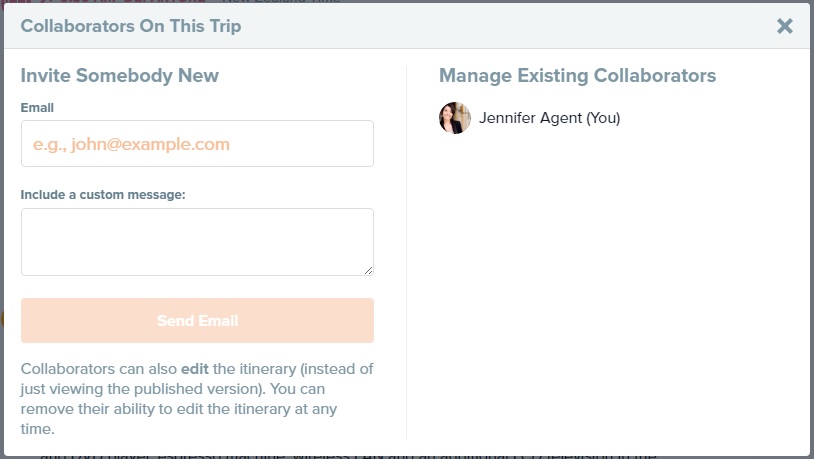
Invite Collaborators
Collaboration is the perfect tool to allow cooperation between yourselves and tour operators, large groups, or even clients. You will be able to get opinions with polls or an idea board and provide access to edit the itinerary.
To invite a Collaborator, enter their email address, a custom message, and click ‘Send Email’.
Note: The Collaborator feature is available as an add on to the Travefy integration. Contact support@tourwriter.com if you are interested in using this advantageous addition.
The collaborator will receive an email invite:

This email notifies the Collaborator that they have been invited to collaborate on the Itinerary. They will be provided with the above link “Join [Agent Name] on Tourwriter” which links to a page where they will be required to create a login id in order to collaborate (only requires Name, Email Address and Password).
Your Custom Message appears below the trip name. Your company name, title, contact number and website are also listed in this email.
Collaborators can:
- Edit all aspects of bookings
- Add New Events
- Get involved in Discussions
- Add and vote on Ideas + Polls
Collaborators cannot:
- Update your trip details eg. Publish / Unpublish, change trip name change trip start date, change price etc
- Invite/Manage other collaborators
- Share itinerary as an Email
- Access your Content Library
Once Collaborators have accepted the invite, the Invite Collaborators button will change to Manage Collaborators in the Agent’s account. You can invite more Collaborators, and manage the existing Collaborators by removing their editing rights.
Send to Clients
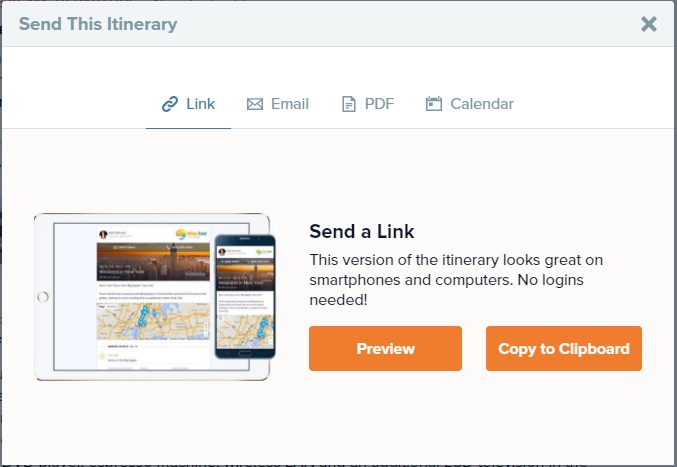
The Send This Itinerary pop-up allows you to share a view-only version of the Itinerary with your client. The pop-up provides four options to do this:
- Link – This version allows you to preview what the Itinerary will look like, just click the Preview button and the Itinerary will open in another internet browser tab. To copy the link, click the Copy to Clipboard button. Next open the place in which you would like to copy the link to (eg. an email), and simply paste the link (Ctrl + V, or right-click > Paste). Clients who receive this link will be able to view the Itinerary online. If any updates are made to the Itinerary, the Itinerary will be updated and the link will stay the same.
- Email – This version sends a richly-formatted, mobile-friendly email to your client, including your company logo at the top and an itinerary image. Just add in the client name, client email and a quick custom message. Within the email, your client will also receive a link to download the Trip Plans mobile app.
Use this option to send the Mobile App links. - PDF – This version allows you to generate a PDF and then download a copy. You are provided with two options: Condensed and Expanded. The difference is that Expanded PDFs will show one day only per page, while Condensed PDFs will put more than one day per page, if it can fit. PDFs are the best option to use when printing the itinerary.
- Calendar – Sync your itinerary with a native calendar app on an iOS device, Mac or PC.