This Post Covers:
In general, all aspects of the Travefy Homepage. Specifically:
- Trips – view all of your itineraries on Travefy
- What happens when you select a Trip
- What happens when you select Get Help
- Your Account options
- Your Profile options
- What happens when you Sign Out

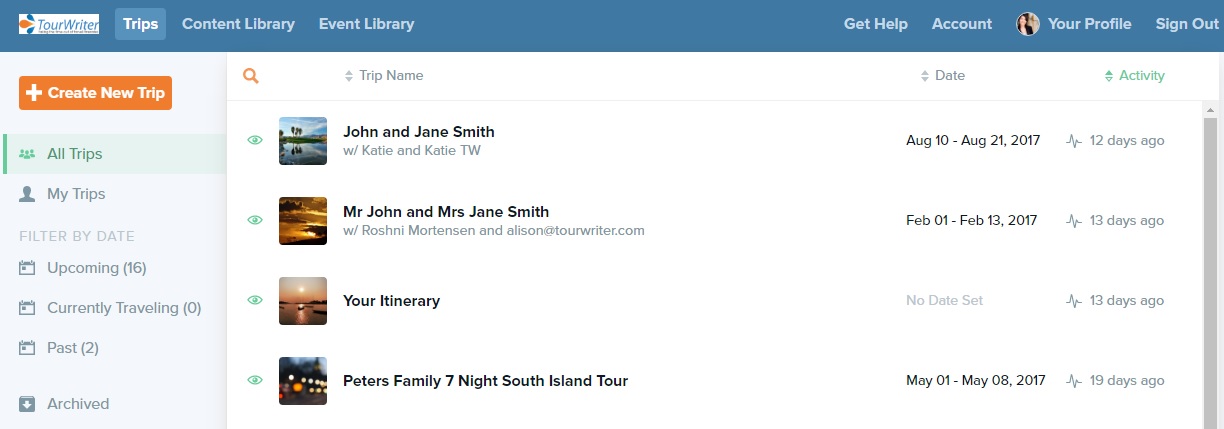
Welcome to your Travefy Homepage. This is the first screen you will see when you log in. Select either Trips or Content Library to view. If you would like Help, to Edit your settings or to Sign out these options are on the right side of the top toolbar.
Trips
All Trips – The All Trips view shows all of your, and your teams, itineraries available in Travefy.
My Trips – View the itineraries that are hosted by you.
Filter By Date – Choose to view the itineraries that are Upcoming, Currently Travelling, or have Past.
Archived – This view shows all archived itineraries. Here you can edit, preview, copy or Unarchive an itinerary.
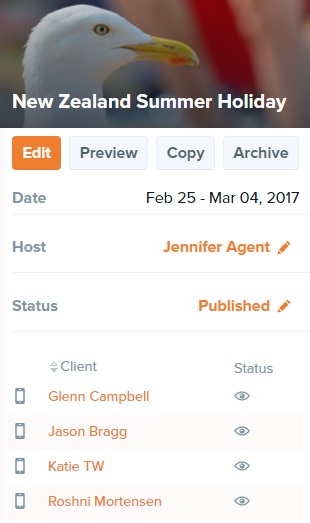
Click on your selected itinerary and you will see further options on the right.
- Edit – make changes and view discussions
- Preview – view an interactive preview of the published itinerary
- Copy – copy the itinerary
- Archive – put the itinerary into archives. This can still be accessed on the Left of the Homepage.
Below these option, you will also see the travel date for the itinerary, the Host (Admin can edit this), the Status of the trip, and the clients who have viewed the itinerary – Phone icon indicated the itinerary has been opened on the Trip Plans App, Eye icon indicated the itinerary has been viewed (hover over this icon for more information).
Get Help
Click on Get Help to send an email to our Support team.
Account
Password
Change your password.
Team
Add, Remove or Edit team members.
Your Profile
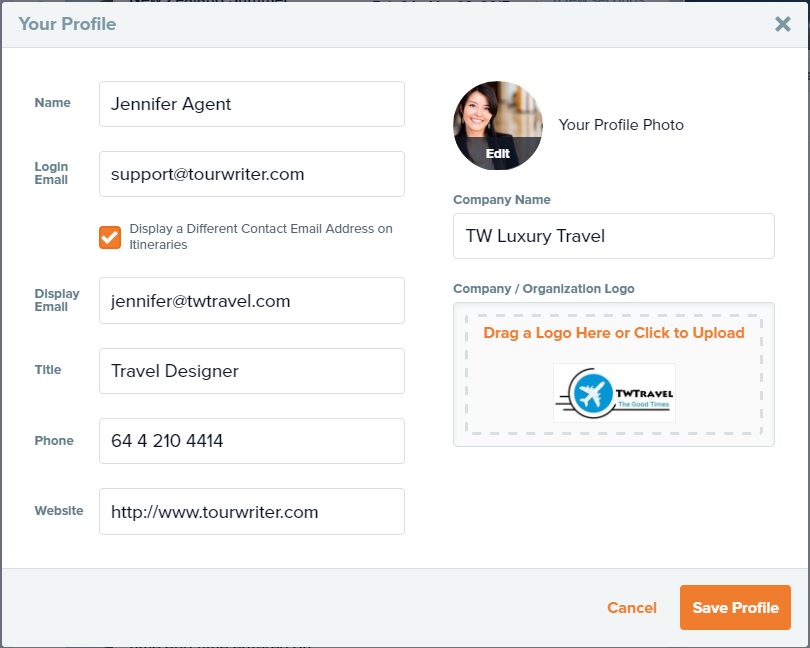
Update your profile here.
Your profile details will appear on Published Itineraries sent to Travelers. Your Email, Website and Phone number will be hyperlinked.
- Name – Add in your display name. This will be your personal name, shown at the top of your itineraries.
- Login Email – Add in your email address. This will be shown in itineraries, if Display Email is not selected..
- Display a Different Contact Email Address on Itineraries – Tick this to open the Display Email field to add an address you would like displayed in Itineraries (if this differs to your standard Email).
- Title – Add in your job title, so your clients know who you are.
- Phone – Add in your contact phone number. This will be shown on itineraries and in emails. This will hyperlink your number on the Mobile App.
- Website – Add in your company website. This will be linked to your logo in itineraries and will be shown in emails.
- Your Profile Photo – This will be shown in itineraries and emails. Otherwise a silhouette image will be shown.
- Company Name – Add in your company name, which will be displayed along with your personal name and job title in itineraries.
- Company/Organization Logo – This will be shown in itineraries and emails. In itineraries your company website will be linked to your logo.
Sign Out
One click will immediately sign you out and take you back to the sign in screen.
