Overview
Tourwriter enables users to export 5 types of data to accounting packages (e.g. Xero, MYOB) that allow data import by CSV or Tab delimited files :
- Customer (Itinerary) Details;
- Related Sales information;
- Client Receipts (as recorded under the clients tab)
- Suppliers information
- Purchases relating to an Itinerary
The Setup Process
The Accounting Setup workspace allows you to set up the basic accounting information for your purchases, bookings and sales. It is where you can create the “bridge” for Tourwriter to communicate (integrate) with your accounting system. Below is step by step guide on how to set up the accounting module.
To ensure that data can be correctly transferred from Tourwriter to your accounting package (e.g. Xero or MYOB), data must be loaded from your accounting package into Accounting Setup (Tools > Setup > Accounting setup).
There are 2 subtabs; Settings and Setup:
Setup Subtab
1. Accounting Tax Types List
Different tax types can be loaded into Tourwriter using the Accounting Tax Type workspace (see below). These tax codes can then be assigned to the respective Nett and Gross Tax Codes for each Service Type (in the Settings Subtab). It is essential the Tax Code here is the same as the tax code in your accounting system, and that the amount (%) is correct for that relevant Tax Code.
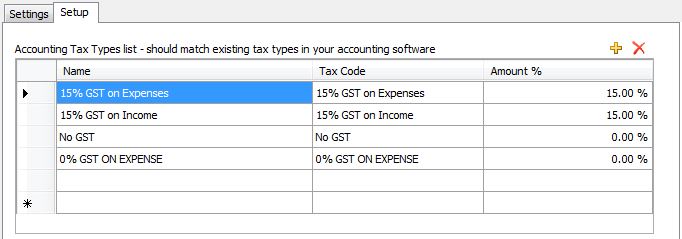
Name
This is the name of your Tax Type. You can choose any name for your tax type, but it needs to be clear.
Tax Code
This is the local service tax code for your specific region. i.e. for New Zealand and Australia this is called GST and VAT for UK. Note: if you are using the accounting integration with your accounting system, you need to ensure this tax code is the same as the code in your accounting system.
Amount %
This is the percentage of tax charged. Simply type the rate into this field (without the %) and press Enter.
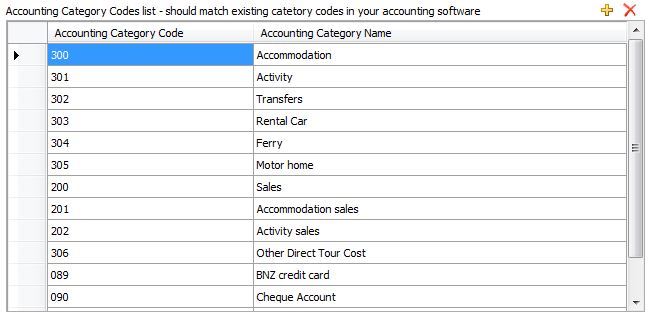
2. Accounting Category Code List
Accounting Category Code
These are the Accounting Codes for your costs and sales accounts. You can get this from your accounting system by referring to your Chart of Accounts.
NOTE – The Accounting Codes entered here will be used in the Service-type Accounting Category Codes workspace of this Settings Subtab.
Accounting Category Name
This is the Account Name for your Chart of Account Codes in your accounting system.
IMPORTANT – It is absolutely essential that the Account Category Code numbers are identical to those used in your own accounting system.
3. Accounting Templates
Tourwriter uses Accounting Export Templates to create files that can then be imported into any respective accounting system that allows CSV or Tab delimited files to be imported.
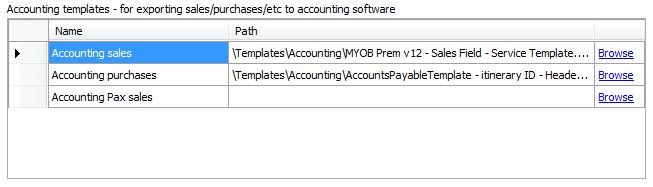
Use the Accounting templates area to load your export templates. In order to perform the accounting export in Tourwriter you will need a set of export templates for both purchases and sales (see downloads provided below).
Xero:
Accounting Sales (Accounts Receivable)
Accounting Purchases (Accounts Payable)
Xero: (Updated tags)
Accounting Sales (Accounts Receivable)
Accounting Sales Pax (Load Pax) (Accounts Receivable)
Accounting Purchases (Accounts Payable)
MYOB:
Accounting Sales (Accounts Receivable)
Accounting Purchases (Accounts Payable)
Download and save your templates to your TourwriterData\Templates folder on your Server (offline customers) or your Online Drive (online customers).
NOTE – Accounting Pax sales templates are only required for Groups customers. Please contact support@tourwriter.com or your Customer Success Executive for this template if required.
The exact names of the fields that can be used in the Accounting Export Templates can be found in the Field Chooser ![]() (top left) in the respective Sales, Receipts and Purchases Subtabs in Itineraries > Additional > Accounting. The field should be preceded by a ! and surrounded by a [ ]. Eg [!ItineraryName].
(top left) in the respective Sales, Receipts and Purchases Subtabs in Itineraries > Additional > Accounting. The field should be preceded by a ! and surrounded by a [ ]. Eg [!ItineraryName].
To create the files, you can use the base templates provided above, and adjust these in Excel. Then save the files as a “Tab delimited” .txt file or a “Comma separated (variable (csv)” file and point the templates to the template you have created using the Browse to navigate to it. Then click Save.
NOTE – Export templates are fully customisable based on your personal preference. i.e. you can choose to use different types of reference numbers (Booking ID) in Tourwriter as your invoice number etc.
Settings Subtab
Tools > Setup > Accounting > Settings Subtab
1. Default Payment Terms
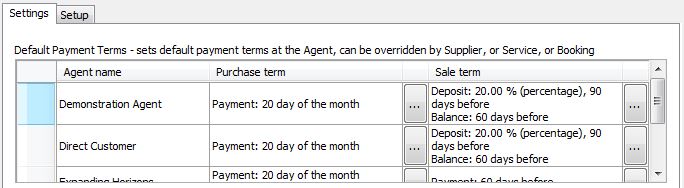
Agent Name
This is your agency or any other agents that you work with, as loaded under Tools > Setup > Agent Labels.
Purchase Term
This is the standard payment term that you use to pay your Suppliers the balance (and deposit if applicable). Generally this will be the same for all agents. To input the terms, click on the ![]() to see the Payment Terms Editor popup window. You will see that there are 4 payment term options available in the dropdown field.
to see the Payment Terms Editor popup window. You will see that there are 4 payment term options available in the dropdown field.
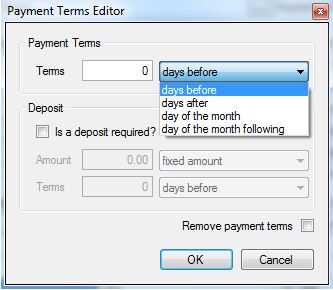
If a deposit is required you must tick the “Is a deposit required?” box, populate the Amount Field and select from fixed amount or percentage. You must also populate the Terms field with one of the following options;
- days before
- days after
- day of the month
- day of the month following
NOTE – The information loaded in the Payment Terms Editor will become your Default Setting and will be applied across your entire database.
Please refer to Override Payment Terms and Tax Code for specific Supplier, and Override Payment Terms and Tax Code for a specific Service, to override the Default settings.
Sale Term
This is the standard payment terms offered to your clients. These can not be overridden at the Itinerary level.
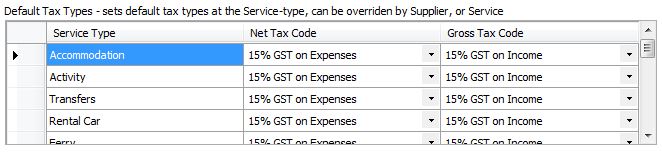
2. Default Tax Types
Default Tax Types can be assigned to Net and Gross sales for each Service Type. These can be overridden at the Supplier level (pre-set in the setup tab > Accounting tax type).
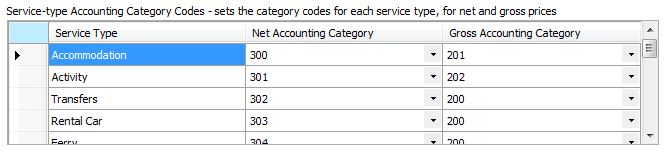
3. Service-type Accounting Category Codes
By completing this section, you are creating a “bridge” between Tourwriter and your accounting software using those accounting category codes.
Service Types are how Tourwriter recognises what sort of services are being offered, eg. accommodation, flight, day tour. Loaded against each Service Type is a Net Accounting Category code and a Gross Accounting Category code. The difference between the two groups is that Net Accounting Category is for Purchase codes (how much the service costs), and Gross Accounting Category is for Sales codes (how much the service was sold for).
Click the dropdown to select the Net and Gross Accounting Category Code/s for each of your Service Types. Accounting Category Codes are setup at “Tools > Setup > Accounting setup > Accounting Category Code.
NOTE – Net Tax Code is the Purchase Tax Code and Gross Tax Code is the Sales Tax Code.
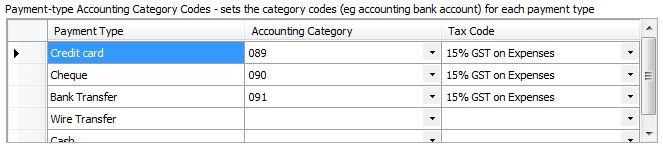
4. Payment-type Accounting Category Code
You can assign Bank account codes to the different payment types you have loaded into Tourwriter, e.g if your credit card payments always go to your cheque account, under accounting category you would enter in the accounting code for your cheque account. The example below illustrates this (ie. the accounting category code for the cheque account for this company is 089 and all credit card payments go into their cheque account).
NOTE – In general, receipts have an “N-T” No tax code associated with them.
Interface Setup
Watch the following video for information on how to integrate your accounting software with Tourwriter.
Additional Markup Container
If you use the Final override function for your Itinerary, you need to assign a Service Type that you want all overrides to be attributed to (Fees for example).
![]()

The total value of the Itinerary, based on standard commission levels, is US $6192.93. When you use the Final override field to round it up to US$620.00 (as seen above), you have created an additional profit of $7.07 for this Itinerary. The Additional markup container allows you to allocate this profit to a specific Service Type (in the Additional markup container image above the Service Type selected is Fees).
Default Received Payments
![]()
You should assign the default type of payment type from the drop down list (this can be overridden for each payment received).
Accounting Software Type
Choose the type of accounting software that you want export to from the drop down list – either Xero or Myob.
![]()
- If your software package accepts CSV files choose the Xero option.
- If your accounting software accepts tab delimited (TXT) files chose the MYOB option.
We recommend that you contact your current accounting software provider to confirm which file type their software accepts.
Manage Accounting Security
It is important to ensure that Accounting Edit and Data Export processes are performed by the appropriate person in your organisation (normally only the accounts person and one backup person if applicable, e.g. a manager). This will prevent data that has been exported to your accounting system being changed incorrectly. To review User Role Permissions, see Tools > Setup > User accounts > Account types to set Permissions in selected Role and then go to Tools > Setup > User accounts > User accounts to apply these Permissions to individual Users.
Override Payment Terms and Tax Code for a Specific Supplier
Go to, Supplier > Details Tab

Click the (edit) button to enter a Payment Term for a specific Supplier, and click on the tax type override. You can then override the tax type for this specific supplier thus overriding the Default settings.
Override Payment Terms and Tax Code for a Specific Service
Goto, Supplier > Services > Configs

Again, click the (edit) button. You can enter the payment term for this specific Service, and click on the tax type override to override the tax type for this specific Service.
NOTE – This will override both the supplier setting and the default setting.