The Minim add-on feature lets you integrate .NET with Tourwriter Online for publishing itineraries only. Push your existing .NET itinerary to Tourwriter Online and create a public link to share with others. You will need an active Online account and access to your User API key. Please check with Tourwriter support for further details about these.
Terminology
Here are a few of the terms we’ll use throughout this guide, with their meanings.
| Agent | Anyone logging into the Tourwriter system. That’s you! |
| Traveller | Someone that you sell direct to, or a person travelling on an itinerary you’ve sold to a Key Contributor |
| Tourwriter | The Tourwriter application and database |
| Minim | The title for the new online platform by Tourwriter |
| Agent Portal | This is where you’ll log into to view your list of itineraries pushed from Tourwriter to Minim, manage your image gallery and set your preferences. |
| Online Itinerary | The digital version of your itinerary created in Minim that is shared with your traveller |
| Proposal | The proposed itinerary. |
| Accepted itinerary | This is when your customer has accepted the proposal itinerary but all the bookings are still not confirmed. |
| Final | The final (confirmed/in-country) itinerary. |
Supported Browsers
Minim supports Google Chrome (Google Chrome auto-updates, so you most likely already have the latest version), Firefox, Safari and Microsoft Edge.
Setting up Tourwriter
When your itinerary is ready to be pushed to Minim, ensure that the Assigned To field in the Itinerary tab has the correct Tourwriter user chosen. Before an itinerary can be pushed online a Contact Card needs to be associated with the Assigned to User. Not doing this will cause a Push error.
The Assigned to user should also have a User account with a matching email address in Tourwriter Online.
User account in .NET do not have a Contact Card created by default. To check a User Contact Card, click Contact details in the Manage user accounts workspace opens up the user’s contact card. The contact details can also be accessed from the Contacts section.
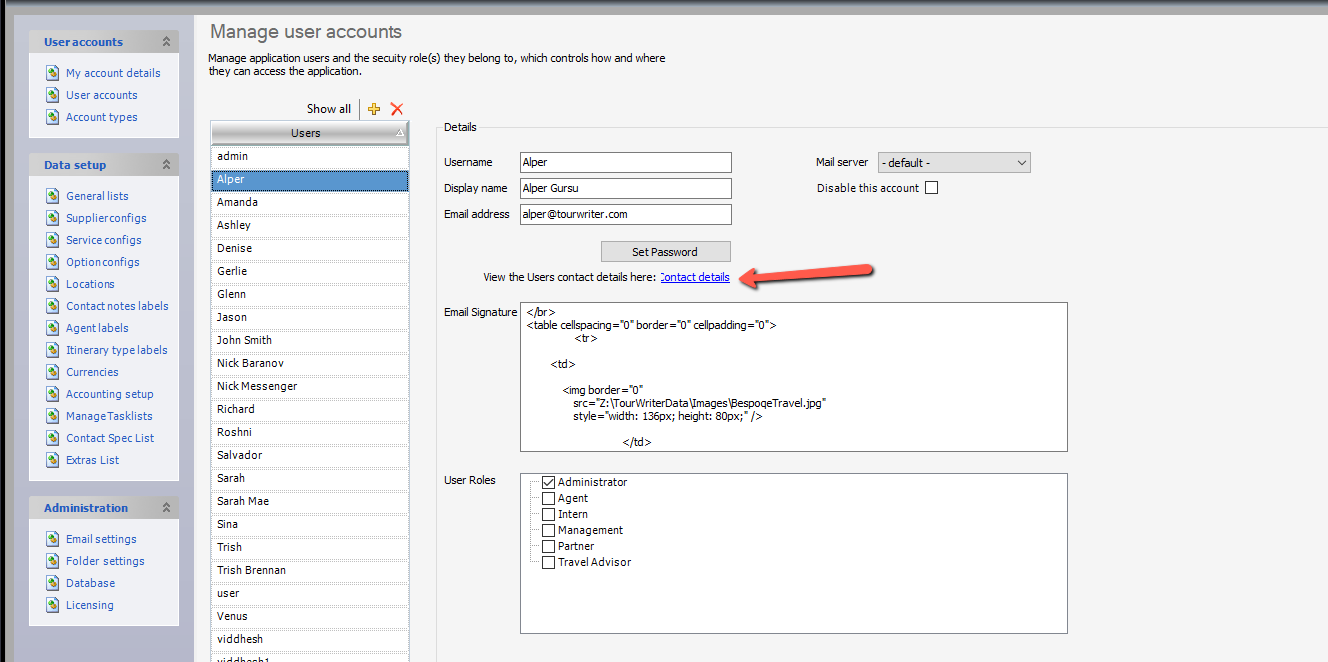
When you click Contact details for a Tourwriter user who hasn’t been assigned a contact card, a Tourwriter message pops up to allow you to create a new contact card. Doing so will link the First name, Last name and Email 1 contact card fields in Tourwriter to contact details that appear in the Booking process section in Tourwriter Online.

Setting up your account
You will be sent an email containing your Minim API key (for Tourwriter).
In Tourwriter
Open any Itinerary.
- Click on the Bookings > List tab
- Click Tools
- Select Push itinerary to online…
On the Upload Itinerary to Online screen
- Click on the Push to drop-down.
- Select Minim
Before you push the itinerary to Minim, click Settings to configure Minim. The Minim Setup window will open:
- Add API User key
- Map Remote Service types to your .NET Local service types.
- Map Publishing types
- Map Status types
Please copy and paste this into the line at the top of the window (refer to the screenshot below) ensuring there are no extra spaces at the end of the key.
How to get your API User key
To get your API key, log in Minim and navigate to your account section.

Mappings
As part of the Tourwriter-Minim integration, you need to map Tourwriter fields with Minim fields. Only after configuring the mappings can you push an itinerary, and subsequently re-push a previously pushed itinerary, in Minim. The Mappings section includes three subtabs.
Service Types Subtab
Once you enter the unique API user key, move on to the Service Types subtab under the Mappings workspace. Here you need to map your Local Service Types to the Remote Types. Remote Types are the product types in Minim. This means that you will be “telling” Tourwriter which category to display your information in. For example, if you have a Breakfast service type, map it to Meal as shown in the screenshot below. The Local Type represents the Service Types loaded in Tourwriter, and the Remote Type field (hover over the field and use the drop-down list) includes the list of available product types in Minim.

Status Types Subtab
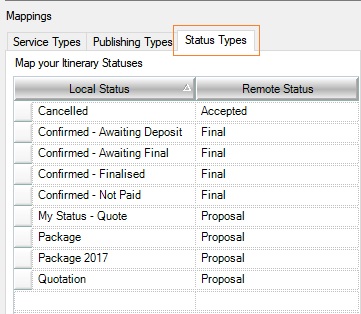
Next, you need to map your local Itinerary status in Tourwriter to remote status in Minim. Itinerary status (local status) describes the overall status of an itinerary at any one point in time, For example, Quotation, Confirmed – Finalised and so on. In the Minim Setup window, you will see your existing Itinerary status list under the Local Status filed. Use the drop-down menu under the Remote Status field to link your Tourwriter Itinerary Status to either Proposal, Accepted or Final in Minim.
Publishing Types
The Publishing Types subtab lets you map Tourwriter Content type fields to Minim fields. To learn more, see the Push to Minim Settings section in the The Edit Publishing Functionality article.
Content rules
The Content Rules Engine allows you to define exactly which publishing content is pushed to Minim. You can create numerous templates for the different stages of your itinerary creation process, as well as set different rules for different languages or audiences.
Content Rule Template Setup
- On the Bookings List, go to Tools > Push itinerary to Minim…
- Click Content rules…
- The Content rule setup window will appear.
- On the left, under Rule Templates, click the Yellow plus sign and give your template a name, e.g. Quotation or Final Itinerary.
- On the right, click the
 sign to create new content rule record.
- Use the drop-down options to specify the Service Type name, whether you want to display Supplier or Service level content for that Service Type, Content Type and whether you want a Publishing Quick Note displayed before or after the publishing content, or not at all.
Note: If you have selected a default Content type for the itinerary through the Edit Publishing functionality, the Content type field on the Content Rule setup window will grey out. To know more, refer to The Edit Publishing Functionality.
- Click Save Template.
- Add additional Rule Templates by following steps 4-7.
- Back on the Upload Itinerary to Online screen, select the Template Name from the Choose Content rule template drop down before Pushing an Itinerary to Minim.
An example of a Content Rule Template is included below:
Example – Quotation Template
Accommodation– The first line shows that an Accommodation publishing content will be used in Minim. It will use the Supplier Level content, which is publishing content that is loaded for the overall Supplier (rather than a Service option). It will use the Quotation Content type, which is the content loaded for quotations (rather than final documents etc.). Any accommodation publishing notes will come Before the publishing content.
Activity– The second line displays an Activity publishing content. It will use the Service Level content, which is publishing content that is loaded for a specific Service (rather than an overall Supplier). It will use the Quotation Content type. Any activity publishing notes will come Before the publishing content.
Transfers– The third line shows that a Transfers publishing content is configured to be used in Minim. It will use the Service Level content, which is publishing content that is loaded for a specific Service (rather than an overall Supplier). It will use the Quotation Content type. Any transfer publishing notes will come After the publishing content.
The Sort Order field allows for additional content of the same type to be ordered, if for example, you would like to publish both a Supplier Level and Service Level description for Accommodation.
Only those Content Types mapped in your Content Rules template will appear on the client’s itinerary. This allows you to customise the content that you share with your traveller or agent at each stage of the itinerary creation process.
Log into Minim
Log into https://minim.tourwriter.com with your username and password. If you do not remember your Minim password entered when signing up, click Forgot password to have the password reactivation link emailed to you. The Itineraries list view is the first page displayed as you login to Minim. All itineraries are displayed on this page. That’s it, you are now ready to push your first itinerary from Tourwriter to Minim.
Pushing an itinerary to Minim
In Tourwriter, open any Itinerary.
- Click on the Bookings >List tab
- Click Tools
- Select Push itinerary to online…
On the Upload Itinerary to Online screen
- Click on the Push to drop-down.
- Select Minim.
Choose Content rule template
Each time you push an itinerary to Minim, you will need to choose the Content rule template to use, as setup during the Content Rules setup process outlined above. Your default Content rule template will be pre-selected.
Refresh all images
When this option is ticked, all images will be refreshed, even if they have already been uploaded. Untick this option if you would not like to refresh your images in Minim.
Create a new online version
This option creates a new version of the itinerary in Minim. It will be automatically ticked (and greyed out) if the Itinerary has not been pushed to Minim yet.
If you are updating an existing itinerary, this option will be automatically deselected, so the existing itinerary in the Minim is updated. Select this option to create a new version of the same itinerary.
Output
This box is a passive field which simply lets you know what is happening with the Upload. You will see the stages of the upload and when the upload is complete.
Settings
This will open the Setup Itinerary Push Window. For more information about this, please refer to Setup above.
Open Online
This feature allows you to open the itinerary in your browser. If you are already logged into Minim, you will be taken directly to the Itinerary Page. If you would like to see the updated version, please wait for the upload to finish, before opening.
- Select Upload and your view of the online Itinerary will open directly in your browser, ready for you to apply the Hero image & logos, before sharing with your traveller.
To learn the other functionalities that come with your Minim Add-on feature, refer to the following articles: