The Audit Trail logs any updates or deletions made within an Itinerary, Supplier or Contact.
Accessing the Audit Trail
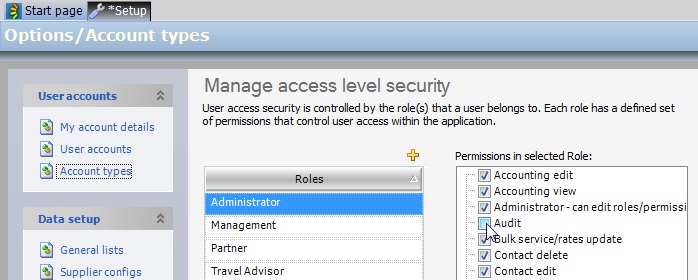
Firstly, permission must be set up in order for each User Role to gain access to the Audit Trail area. To do this go to Tools > Setup > Account types and select (tick) Audit in the Permissions in selected Role box.
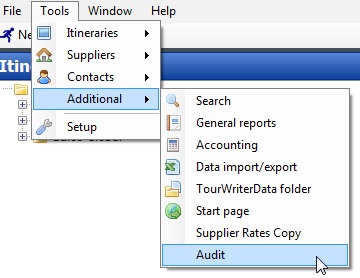
The Audit Trail is then accessed by going to Tools > Additional > Audit.
How to Load Audit Results
- In the Search field, select either Itineraries, Suppliers or Contacts
- Select a date range
- Click Search
The results window will display all updates or deletes made within the specified date range.
IMPORTANT: Only updates and deletes made after the July 2015 update of Tourwriter (Version 2015.7.16) can be reported on.
Which Audits are Logged?

The Results window displays the following information:
- Name – The name of the Itinerary, Supplier or Contact that was changed
- ID – The ItineraryID, SupplierID or ContactID of the record that was changed
- TimeStamp – The date and time that the change occurred
- State – Whether it was an Update or Delete
- TableName – The table that was updated in Tourwriter
- ColumnName – The field that was changed
- Before and After columns – The before and after values
- UserName – The name of the logged in user who made the change
Note that the After field is blank for deleted changes.
Customisation Options
Ordering Audit Results

By default, the Audit results are ordered in ascending order by the ‘TimeStamp’ field- this is a good display option, however if you wish to order by an alternative field, such as ‘State’ (for example), click on that field header. A triangle appears on the far right of the field header – this indicates the Audit results are now ordered by ‘State’, in ascending order. If the field header is clicked again, the triangle becomes inverted which means the field is now displaying in descending order. Note that multiple fields can be ordered simultaneously by holding down the ‘Shift’ key and clicking on additional field/fields.
Moving Fields

Field order can be changed by clicking on a field header and dragging it and placing it elsewhere. The field will be dropped in where the double arrows appear and once the mouse button is released.
Adjusting Field Width

Hover the mouse at the end of the field header until double horizontal arrows appear, then double click and the field will resize in order to fit the longest piece of content that features within any cell of the field being adjusted.
How to Filter and Print
Click the Filter icon ![]() , to enable field data filters. Click a field heading to filter by that field.
, to enable field data filters. Click a field heading to filter by that field.
Click the print icon ![]() , to view a print preview, then print the current data view. Note the document size/number of pages before printing.
, to view a print preview, then print the current data view. Note the document size/number of pages before printing.
Exporting Data to Excel
Click the Export icon ![]() , to export the data from Tourwriter. The Save As window appears. Save the file in a convenient location. Name the File, Save as Type (default) Excel (*.xls), then click Save. Open the Excel document and use or manipulate the data any way you like.
, to export the data from Tourwriter. The Save As window appears. Save the file in a convenient location. Name the File, Save as Type (default) Excel (*.xls), then click Save. Open the Excel document and use or manipulate the data any way you like.
Saving a Grid Layout
Tourwriter does not automatically save the selected field order in the export grid. To save the layout (i.e. the order you have put them in), for use another time, take the following steps:
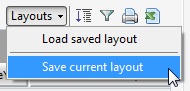
Click Layouts at the top right of the main window, then Save Current Layout.
The Save As window appears. Save the layout to the TourwriterData folder, in the Templates Folder. Please note that if you save the layout outside of the TourwriterData folder, a message will appear to notify you that are saving the layout to another areas that your colleagues may not be able to access.
Name the File, Save as Type (default) .xml file (*.xml), then click Save.
Loading a Previously Saved Grid Layout
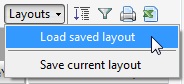
The next time you wish to use the same field layout, load up your required export field eg. Itineraries. Then click Layouts at the top right of the main window, then Load saved layout.
The Open Grid layout File window will appear. From here navigate to the to the TourwriterData Templates folder (or wherever you saved the .xml layout), and search for the saved layout. Open the file and the grid will change to use the field layout saved previously.