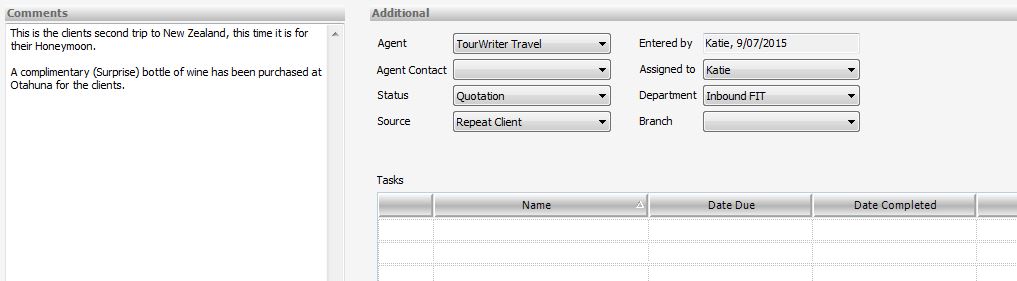
Comments
The Comments field is a passive communication field, i.e. between employees, and can be used to record a brief overview of the client and their travel plans (i.e. honeymoon, active outdoors, into food and wine etc). These comments are not published anywhere, but they can be (please speak to your implementer).
Agent
When creating a new Itinerary, the Agent applied here will automatically be set to the Default Agent, selected (ticked) in Setup under Tools > Setup > Agent labels. A default agency may be a parent company, overseas referral agent, a direct customer or your own company.
It is possible to report on how much business you are receiving from each of your Agents. See Tools > Additional > General Reports > Itineraries Per Agent.
IMPORTANT: By applying the Agent to the Itinerary tab, any margin overrides for this agent will be applied to the bookings on your Bookings > List tab. These margin overrides will be used in place of your Supplier-level markups/commissions.
Agent Contact
Use this field to allocate the applicable Agent Contact person from the drop down box. You can set up/add new Agent Contacts under Tools > Setup > Agent Labels.
Status
This is your overall Itinerary status, not individual bookings status. It is possible to use the Status to customise text on client documentation (i.e. pricing documents)
Example: When the Status is Quotation, your quote or pricing document could be coded to state “this quote is valid for 7 days, we require a 20% deposit to secure your booking”.
The Itinerary Yield report (Tools > Additional > General Reports > Itinerary Yield) allows reporting on figures based on itinerary Status across a specified date range (e.g. prospective sales for next high season etc). Please note that access to the Itinerary Yield report can be restricted according to user roles (Tools > Setup > Account Types > Report – Itinerary Yield tick box under Permissions in selected Role).
Source
This is how you received this booking. For example, the booking may have come from a repeat client, your website or a referral. To customise your Itinerary Source list, go to Tools > Setup > General lists > Itinerary source.
Entered by
This field defaults to the user who has logged in to Tourwriter and created the new itinerary. The date the new itinerary is created will appear next to the name of the person who created the new itinerary. For copied itineraries, this field will show the user who created the copy, and the date the itinerary was copied.
Assigned to
This field is used to show who is responsible for this Itinerary. The Itineraries Per User report (Tools > Additional > General Reports > Itineraries Per User) allows reporting on figures based on users across a specified date range.
Department
This field is used to categorise your Itineraries by specific departments within your company. For example categories may be Inboud FIT, Inbound Groups or Outbound FIT. To customise your Office departments, see Tools > Setup > General lists > Office departments
Branch
Use this field to categorise your Itineraries by specific branches within your company. To customise your Office branches, see Tools > Setup > General lists > Office branches.
Tasks
Use this field to manage your To Do list. You need to manually enter the Date Due. Once the task has been completed, ticking the box in the first field, within the Tasks field, will cross the task out, the respective date will then appear in the Date Completed field (this can be manually adjusted if needed). The Note field is for adding notes applicable to each task unique to that particular itinerary. Additional tasks, unique to the itinerary, can be manually created by clicking ![]() .
.
To customise your Default Tasks, Tools > Setup > Default Tasks. You can then click Populate (next to the yellow plus icon) to add your Default Tasks to this field. To find the Tasks Outstanding Report go to Tools > Additional > General Reports > Tasks Outstanding.