Itinerary Accounting Export
Once Accounting Setup has been completed, and you have Itineraries data to export, you can start exporting your Purchases and/or Sales from Tourwriter into your accounting software.
Also see Bulk Accounting Export.
Open any Itinerary and select the Additional Tab > Accounting Subtab
The Accounting Subtab area is split into two further Subtabs: Purchases and Sales
Purchases Subtab
Allows you to view then export purchases booking information for the Itinerary. Click Load to generate a list of purchases for the Itinerary.
Sales Subtab
Sales invoices information for the Itinerary
Edit Sales

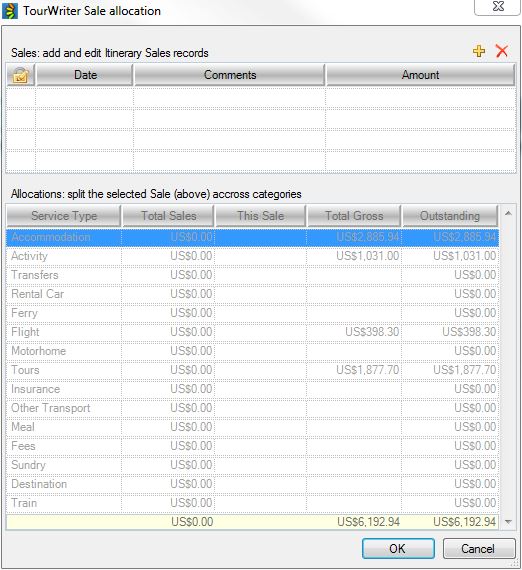
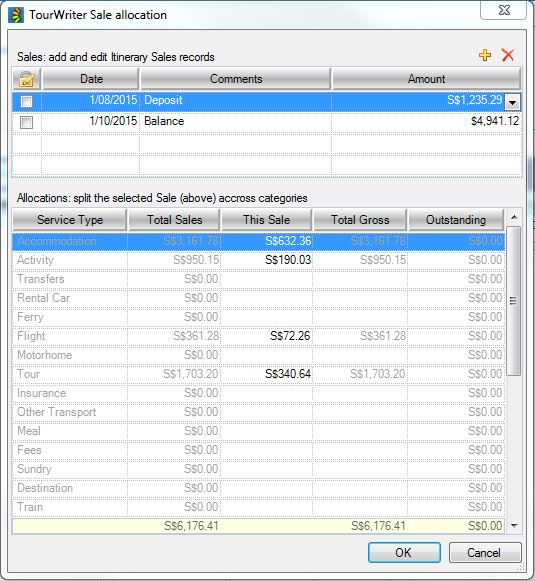
This option only applies to the Sales Subtab. The Edit Sales button opens the Tourwriter Sales allocation popup window. Here you can add and edit Itinerary Sales records allowing you to allocate revenue to each revenue account.
NOTE – You must edit your Sales before pressing the Load button.
Tourwriter Sale Allocation Window
You can create a Sale for the deposit amount of $xx.xx; simply click on ![]() and enter the following sales information:
and enter the following sales information:
NOTE – The amounts in the Clients Tab > Client payments and refunds workspace appear on the Client Pricing Report and Client Pricing Detailed Report. The amounts added to Tourwriter Sale allocation popup window (shown above) are exported into your Accounting software. The reason we keep these areas separate is due to the fact that only some Tourwriter users will utilise the export sales feature (i.e. if they have Xero, for example).
Linking Client Payments to Sales Export
To link the payments on the Clients Tab to the Sales you have edited take the following steps:-
- Go to the Clients Tab > Details Subtab
- In the Client payments and refunds workspace click on the down arrow (triangle), in each of the entries in the Sale field, to select the applicable payment from the entries you have made in the Tourwriter Sales allocation workspace (see image below).

Date
This is the sales invoice date, ie. the date that you want to recognise the sale in your accounting system (as opposed to the date of payment or date of travel).
Comments
Description of sales information.
Amount
The invoice amount.
Other Sales Toolbar Functions
Tick-box ![]()
Tick (choose) the purchase/sales invoice that you want to export
Filter ![]()
Use this icon to filter the information by title.
Print ![]()
Use this icon to print the information that is showing on the current page
Export ![]()
Use this icon to export the information displayed on the current page to an Excel spreadsheet, making it easier for you to change data in your exported copy.
Export the Purchases/Sales information to CSV / TXT file in the format you need.
To export;
- Load the Sales/Purchases information
- Use the tick-box
 to select the invoice that you want to export
 - Click export
 . The TourWriter Accounting Export popup window (shown below) will appear.

- Save the file on your PC Server.
(Note – MYOB users have the option to choose the status of the invoice you can export; Order or Quote) - The file is now ready to be imported into your accounting software
After exporting your Purchases, the Bookings on the Bookings List of the Itinerary will be greyed out, indicating that an export has taken place.
Users with access to Accounting features may unlock Bookings for editing if required.

To do this;
- Click on the Field Chooser

- Tick Accounting
- This will display the Accounting lock field
 (to the right of the Field Chooser icon) on the Bookings List
 - Untick the Accounting lock field
 to edit this Booking
NOTE – Adjustments will need to be made manually in your accounting software to this booking, to ensure your accounting software matches the changes you have made in Tourwriter.
For further information or to receive one-on-one Tourwriter Accounting Integration training, please contact support@tourwriter.com or your Tourwriter Customer Success Executive.


