The Supplier > Additional tab is where data and images are loaded for report population. A brief overview of loading publishing is outlined below:
- In a supplier, access the Additional tab > Edit Publishing Content subtab.
- Click on
 to select content for either a supplier or one of the services from the dropdown list.
- The dropdown list displays options for the supplier and all the services listed in the Services tab.
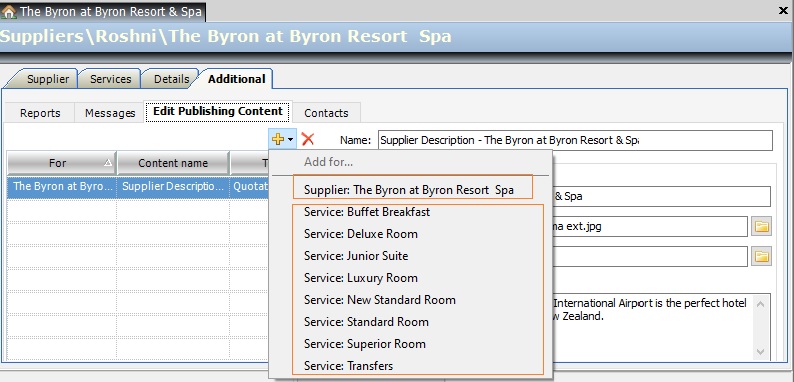
- The first option at the top of the list will always be for the overall Supplier; the Services are listed below this. All Services are included in this list. This includes Non-Active Items in the Services list.
- Select your required supplier or service line. If you load publishing content for the supplier line, the content will apply for the overall supplier. If you load publishing content for the service line, the content will only apply for the particular service.
- The Content chooser window opens to display the list of existing publishing content in the database. This list may be long and full of descriptions that have been loaded as part of the demonstration supplier information. The Content chooser list gets longer as more publishing content is loaded.
- In the Content chooser window, click again to bring up a new publishing content line in the Publishing Content Field.
- Ensure the correct Publishing Content is highlighted on the left before editing your content.
The For field
This field is automatically populated upon adding new publishing content. It will either be called the overall supplier name or the service name. Upon saving, the list will re-order itself into alphabetical order of the For field.
The Content Name field
This column is linked to the Name field on the top-right side of the workspace. Use the Name field on the top-right, rather than the Content name to input the information.
The Content name field allows you to apply a name to the publishing content to make it easy to find within the Content chooser window. This name does not show up on any documents.
Overtype “New Content” with a clear naming description.
Tip: For supplier level content start with ‘Supplier Description:’ (e.g. Supplier Description: Pullman Auckland) so all supplier descriptions are ordered together within the content chooser.
Tip: For service level content start with ‘Service Description:’ so all service descriptions are together.
It doesn’t have to be the full name, just enough for it to be easily found. Once saved, the new content name attaches itself to the middle field. Entries will move into alphabetical order of the For field, once saved. Therefore, once saved, double check the correct publishing content is about to be edited before making changes.
The Type field
Fill in the Type field by clicking the field and selecting the Publishing Type from the drop-down options.
It is very important to assign the right content type to each individual Publishing Content, as the Type options define how the Publishing Content will be shown in the Reports. If there is a big blank space within the report, the first step is to check Publishing Content to make sure Type has been assigned to the Publishing Content.
The Heading field
Reports typically displays a combination of the Booking Name and Item Description (on the itinerary Bookings Tab). The Heading field can be used if this information is irrelevant and/or should not be displayed on a client’s itinerary. E.g. a rental vehicle may have lots of codes and descriptions within the Services > Name and Pricing Options field, but this type of information might not be desired on a client’s itinerary. The Heading field, therefore, allows this information to be simplified for client documentation purposes.
The reports can be coded to pull through the Heading text rather than the Booking Name/Item Description, where applicable.
This field is not usually required for supplier level content, it is generally used for the purpose of service descriptions.
Image path
The path for images are loaded in the Reports image and the Online image fields. Report images are added to the Reports image field and saved in the TourwriterData\Images folder.
Example – Country/Name/Region/Accommodation/Activities/Restaurants
To load an image path:
- Click on the Folder icon next to the Reports image or Online image fields. Tourwriter will navigate to your TourwriterData folder.
- Click through to the Images subfolder and select Open.
- Tourwriter then attaches the path to the image.
It is only possible to attach one image per content type. If a string of images are required (e.g. panoramic view), the photos will need to be stitched together in another editing program (e.g. Photoshop), saved as one JPEG and then it can be uploaded to the Tourwriter database.
Tourwriter can’t wrap text around images. E.g. when outlining an activity inclusion it is not possible to have a paragraph, image and subsequent paragraph. The image needs to be on either side of the paragraph.
NOTE
The Images folder must be set up with a clear subfolder structure (good planning is important here). It is important to ensure that the folder structure you create will not need to be changed. If images are renamed or moved to a different folder you will have to reload the new Image path for that image (as the old image path will no longer be correct). An INCORRECT image path can be identified in your Tourwriter reports by the presence of a small red x in the corner of the location where the image should be.
The Body HTML field
This field is used to load descriptions of services and suppliers that appears on the client Reports (documentation) that you produce from Tourwriter. This field can be enabled to allow HyperText Markup Language (i.e. HTML) however it is recommended supplier and service descriptions are entered as plain text. Reports using this information will then apply the correct font style and size, as determined by the report coding/scoping. We suggest that you avoid using bullet points and where possible keep descriptions brief.