The following information explains how to customise your default booking request Template in Tourwriter. We recommend watching the above Tourwriter Webinar: Booking Email Template Customisation, prior to utilising the information below.
The Tourwriter Bookings Emailer Template
When you install Tourwriter, a copy of the default Tourwriter.Email.BookingRequest.html template is installed onto each user’s computer. While the standard template is useful in the initial testing stages, you will probably wish to create a customised Booking Request Email Template, for example, one with a different subject line, different colours, or you may decide to completely redesign one. While you can always contact our Support Team (support@tourwriter.com) for these changes (please note charges apply), with a little HTML knowledge, you could create a customised template using the information provided below.
Download a Copy of the Default Booking Request Email Template
Our standard (default) Tourwriter Booking Request email template is available to download by using the following link:
The above link is likely to download as an internet HTML file. To make any of the edits outlined on this page, please open your Tourwriter.Email.BookingRequest.html in Notepad or a similar program. To do this, find the document in your “Downloads” folder in My Computer, then right click the document and select “Open With”. If Notepad is not on the list, select “Choose Default Program”, expand “Other Programs” and select Notepad from this list.
Save a copy of this template to your TourwriterData\Templates folder, noting that any changes you make will be immediately reflected the next time you make a booking from any Itinerary in Tourwriter (Bookings > List > Make Booking). If you would like to do some testing first, you can save the template to your Desktop and attach as a template, as explained in the Template Testing Instructions section below.
What is HTML?
HyperTextMarkup Language (HTML) is the main markup language for displaying web pages and other information that can be displayed in a web browser. Tourwriter uses HTML in its Booking Emailer.
HTML is written in the form of HTML elements consisting of tags enclosed in angle brackets (like <html>), within the content. HTML tags most commonly come in pairs like <h1> and </h1>. The first tag in a pair is the start tag, the second tag is the end tag (they are also called opening tags and closing tags). In between these tags you can add text, tags, comments and other types of text-based content.
The HTML tags will not be visible on your template, but they will be used to interpret the content of the page.
The Tourwriter Bookings Emailer Template also uses Tourwriter Tags. The text you see within square brackets, and that start with an exclamation mark, are Tourwriter Tags, for example [!HostName] will pull through the Host Name field from the main Supplier Tab. For a full list of tags for use with the Tourwriter Bookings Emailer Template, please clickhere.
Below are some examples of some basic HTML tags to apply within your template.
Standard paragraph:

<p>This is some text in a paragraph.</p>
Text in italics:

<i>Italic text</i>
Bold text:

<b>Bold text</b>
Using an Online HTML Editor
You can use an Online HTML Editor to generate HTML code. The online HTML editor tool lets you type your email signature in plain text, whilst allowing you to include links, logos and images. The editor generates a live visual preview of your HTML code. In the editor, you can even copy an existing email signature from, say, your email service and paste it in the Editor field to generate live HTML code. You can then paste the HTML code in the Email Signature field under Tools > Setup > My Account Details > Email Signature.
Editing your Email Signature
If you wish to customise each users’ Email Signature, you can do this within the Tools > Setup > My account details (or User accounts area if you have the appropriate permissions). The Email Signature field must be written in HTML.
An example of a basic Email Signature is: <p> Kind regards,</br> Daniel Carter</br> <b>World Rugby player of the year</b></br> Support NZ freephone 0800 293 7663 | Support International +649 293 7663 </p>
Changing the Subject Line of your Bookings Emailer Template
Insert the following orange text into your HTML template, and amend your subject heading text as required. You can use a combination of hard coded text and Tourwriter tags to create your required subject line:
[!SubjectStart]Booking Request for [!ItineraryName][!SubjectEnd]<html>
Use span style to make one line or portion of text a different font size and/or colour compared to the rest of the text in your template. The below example shows a mixture of 14pt, 11pt and 8pt fonts, and a switch from Calibri to Tahoma font.
<p>
 Thank you,<br/>
 [!UserName]
 <p>
 <img src="T:\TourwriterData\Images\Tourwriter_logo.jpg"/><br/>
 <span style="font-family: calibri; font-size: 14pt; color: black;"><b>Company Name</b><br/></span>
 <span style="font-family: calibri; font-size: 11pt; color: black;">Address Line 1<br/>
 Address Line 2<br/>
 Phone: +64 4 123 4567</span><br/>
 <span style="font-family: tahoma; font-size: 8pt; color: royalblue;">Email generated from <a href="www.tourwriter.com">Tourwriter</a> - <i>taking the time out of travel itineraries</i> <br />
 </p>
 </body>
 </html>
Displaying Images and Website Links in your Email Signature or Bookings Emailer Template
The following examples can be coded within your Email Signature field under Tools > Setup > My account details and/or within the Booking Email html template itself.
Images Use the following html codes to fetch an image stored on your TourwriterData folder. Please note that you must resize the image to be exactly the height and width required.
Websites Use the following html codes to display a website link:
<p>

<span style="font-family: tahoma; font-size: 8pt; color: royalblue;">Email generated from <a href="www.tourwriter.com">Tourwriter</a> - <i>taking the time out of travel itineraries</i> <br />

</p>
The first portion of the code is the actual website address e.g. www.tourwriter.com <a href=”www.tourwriter.com“>Tourwriter</a> The second portion of the code is how you want the text to be displayed. E.g. Tourwriter <a href=”www.tourwriter.com”>Tourwriter</a> The above coding will mean the word ‘Tourwriter’ is hyperlinked to www.tourwriter.com when clicked.
Email addresses Use the following html codes to display a link to your email address:
If you want to match an exact text colour, you need to find out what the RGB (red, green, blue) values are and convert them to the Hex equivalent. For example, we have the font colour black applied to the Company Name line on our template:
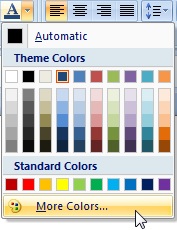
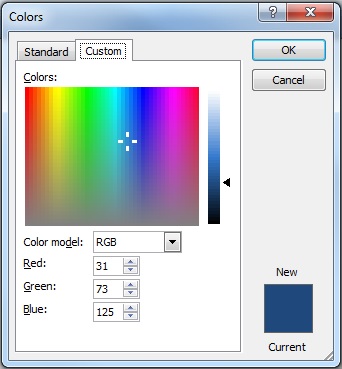
Example: If you would like your template to use the below Dark Blue available in Microsoft Word, you can find the RGB values of this colour by clicking More Colors…
The Custom Subtab will show the Red Green and Blue values.
Add the Hex value as the colour, per the below example. Save your template changes. The Company Name will now be shown in this Dark Blue colour on your template.
By default, the Bookings Emailer Template Tag that represents the start date of a booking is displayed as Wednesday, 01 April 2020 14:00. It includes both the date of the booking, written in the long date format, as well as the time of the booking, written in the 24HR clock format.
This format can be amended by inserting some additional date format Tags at the end of the existing [!ItemStartDate] Tag. The same rules apply to the [!ItemEndDate] tag.
Example:
[!ItemStartDate("dddd, dd MMM yyyy")]
will display the date on the email like this: Wednesday, 01 April 2020 and
[!ItemStartDate("HH:mm")]
will display on the email like this: 14:00
Date Formats:
Days: d = 1 dd = 01 ddd = Wed dddd = Wednesday Months: M = 4 MM = 04 MMM = Apr MMMM = April Years: yy = 15 yyyy = 2015
Time Formats:
Hours: h = 4 hh = 04 H = 16 HH = 16 Minutes: m = 5 mm = 05 tt = A.M. or P.M.
Here are some other examples of custom date and time formatting, using a combination of the formats above:
Follow these instructions to test your customised template before making it your default booking email template in Tourwriter. You can also follow these instructions if you have more than one template for sending booking requests (e.g. a Cancellation template).
In Tourwriter, open any Itinerary.
Go to the Bookings > List Tab
Select Make Booking then select Add template…. (at the bottom of the drop-down list)
When the Add new template screen opens, please use the first field Name to name the template e.g. Test
Click browse (), and navigate to the .html template saved in your TourwriterData\Templates folder
Select the file, click Open
Click OK on the Add new template screen
Save your changes in Tourwriter (CTRL S) or press the Save icon on the toolbar
On the Bookings > List, select Make Booking again, and your new template will appear in the middle of the drop-down list
Remove template once testing completed
Follow these instructions to set your customised template as your default booking email template in Tourwriter for all users
Create a Templates folder within your TourwriterData folder on your Computer
Save the HTML file to your new Templates folder. Ensure your new template is named “Tourwriter.Email.BookingRequest”, as Tourwriter will look for this exact file in this exact location. Also ensure the extension is .html
In Tourwriter, open any Itinerary
Go to the Bookings > List Subtab
Make booking, select Book all or Book selected and you will see that Tourwriter will have picked up your new template