The File Text Format area will allow you to customise your file names for any reports saved from Tourwriter. These reports include Excel, PDF and Word exports, and PDF attachments when emailing directly from Tourwriter.
Where Are Customised File names Stored?
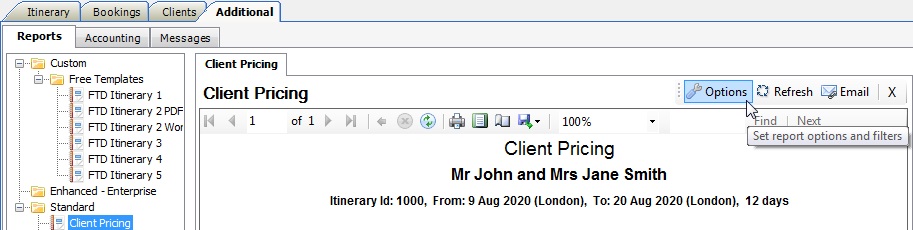
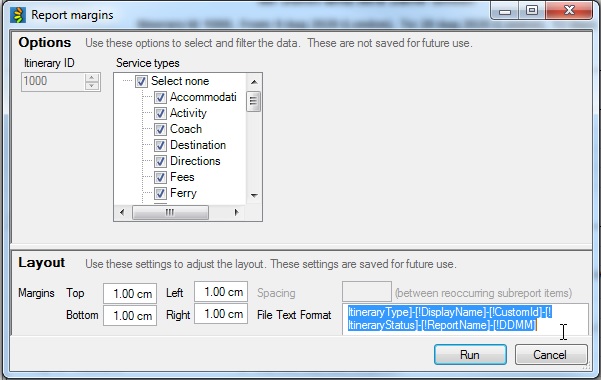
For Itinerary Reports: navigate to the Additional > Reports Tab within the Itinerary file. Run a report (standard or custom) and click on Options to open the Report margins pop-up window. Tags are stored in the File Text Format field (highlighted in the picture below).
For General reports: navigate to Tools > Additional > General reports, run a report (standard or custom) and click on Options to open the Report margins pop-up window (as shown directly above).
How To Create A Customised File name
To create a customised file name you need to change the default File Text Format, which is already populated with default Tags. To customise, delete the Tags you don’t want and then move the remaining Tags into your desired output order. Ensure a hyphen separates each Tag.
Note that only one Date Tag can be displayed in the File Text Format field. If you would prefer to use a different date format, replace the existing Tag with your chosen date Tag from the below format options.
Once you have customised the File Text Format field, click the Run button.
It is important to note that the report must be closed and then reopened in order to trigger the new customised file name.
Once the report has been reloaded, Tourwriter will use the new customised file name for all future exports of this report, across all itineraries. Go through this process for each standard and custom Itinerary/General report, as required.
Example of a customised file name:
File Text Format field: [!AgentName]-[!ItineraryName]-[!DDMMMYYYY]
Report file name output:

Enabled Tags
Itinerary reports
The following Tags have been enabled to allow file name customisation for standard and custom itinerary reports:
- [!AgentName]
- [!ItineraryId]
- [!ItineraryName]
- [!DisplayName]
- [!CustomId]
- [!ItineraryStatus]
- [!ReportName]
- [!DDMM] e.g. 1003
- [!DDMMYY] e.g. 100320
- [!DDMMMYYYY] e.g. 10Mar2020
- [!MMDD] e.g. 0310
- [!MMDDYY] e.g. 031015
- [!MMMDDYYYY] e.g. Mar102020
General reports
The following tags have been enabled to allow file name customisation for standard and custom general reports:
- [!ReportName]
- [!DDMM] e.g. 1003
- [!DDMMYY] e.g. 100320
- [!DDMMMYYYY] e.g. 10Mar2020
- [!MMDD] e.g. 0310
- [!MMDDYY] e.g. 031015
- [!MMMDDYYYY] e.g. Mar102020
Additional Information
- Date Tags are for the date of export (i.e. today’s date).
- The full Tag (brackets, exclamation mark, tag text) must be included in order for the report file name to display properly. If using multiple Tags, ensure Tags are linked together with a hyphen. Also ensure upper and lower case letters are copied properly.
- The Refresh button cannot be used as a shortcut to refresh the report (i.e. instead of closing the report and reopening). Clicking the Refresh button only refreshes content for the report itself, e.g. If an edit has been made to the Itinerary Name field or an agent is allocated to the Agent field etc.
- Ensure no extra line is included at the end of the file name (i.e. don’t press Enter after the last Tag) as the file name will not display properly once exported.