This article guides you through the different ways to add a contact card. Go through the different tabs in a Contact Card. Learn how to customise the Contact Categories and the Contact Labels
Different Sections to add a Contact Card
There are a few ways to add a contact card in Tourwriter. Add a contact card in the Contacts section, in the Supplier, the Itinerary or the Agents section.
- Add a contact card in the Contacts section. Right-click the Contacts folder to add a new contact card or create a folder to add contact cards under.
- Open a Supplier and navigate to the Additional section to add a contact card.
- The Clients tab on the itinerary lets you either enter the Passenger details or create a new contact card for the passenger.
- To add an Agent as a contact card, head to the Setup area. Under Agent labels, select an Agent organisation and click the
 sign in the Contacts section to add a new contact card.
Customising Contact details
A contact card has a couple of sections that you can configure. On the Additional tab, you can customise the Categories list. You can also change the labels that appear to the right.
- To change the Categories list, go to Tools > Setup > General lists. Select the second option, Contact categories. Add new values to the list or edit the existing list values.
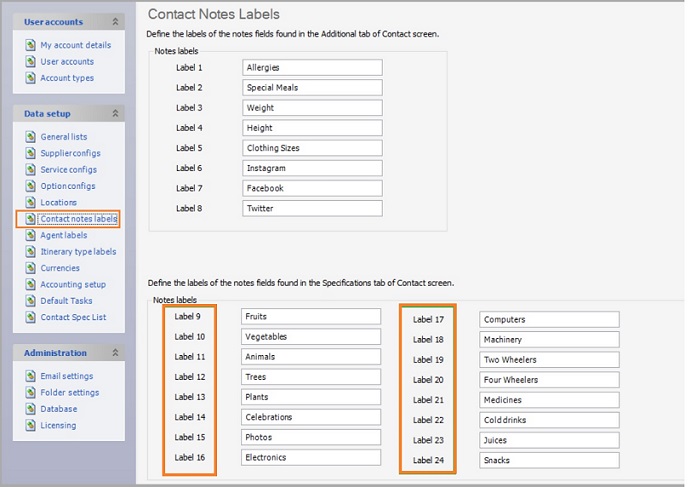
- The Contact notes labels section lets you rename the labels that appear to the right on the Additional tab. Head to Tools > Setup > Contact notes labels and add labels from Label 1 through Label 8.
Watch the video below on how to manage Contacts in Tourwriter
Contact Card Tabs
Tourwriter simplifies accessing information about a frequent passenger. Moreover, you can also record additional information for a passenger.
We have further extended the feature to customise the Contact Card fields in the new Specifications tab. The Specifications tab introduces 16 new customisable fields to your Contact Card. Additionally, through the History tab on a Contact Card, you can view a list of itineraries a contact has been a part of.
Let’s go through the setup to make the additional Contact Card fields available.
Setting up Field Labels
The 16 new customisable fields on a Contact Card includes 8 new free-form text fields and further 8 options available through a dropdown menu. Let’s see how to configure these additional fields to bring it through to a Contact Card. To set up labels for new fields on the Specifications tab:
- Navigate to Tools > Setup > Contact notes labels. Here, Labels 1-8 are reserved for fields on the Additional tab.
- Scroll to the bottom and add titles for Labels 9 through 24.
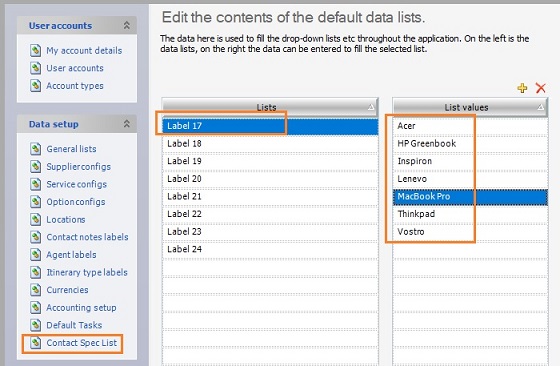
- You can include dropdown options for some labels. Navigate to Tools > Setup > Contact Spec List to populate the dropdown list for Labels 17 through 24.
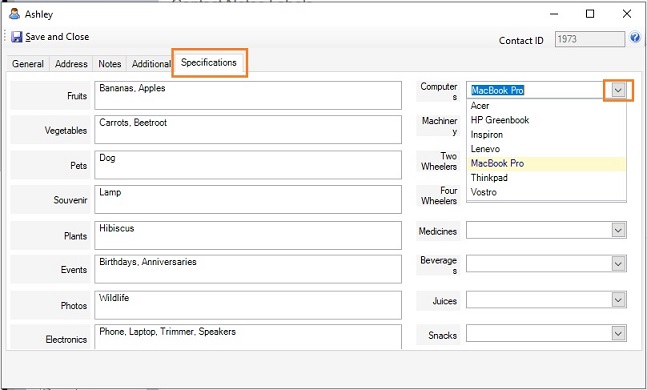
- Open a Contact Card and go to the Specifications tab to see the new customised list. Select an option against any of the dropdown fields as shown below.
Importing Contacts
You can now use a new import template to import your Contacts to Tourwriter. The new import template lets you populate the data for fields in the new Specifications column. To download the import template and go through the detailed steps to import Contacts into Tourwriter, click here.
Exploring the Contact History
Along with the itinerary details, information such as passenger agents, itinerary start & end dates and the amount paid by the passenger are available through the History tab. To access these fields:
- Open a Contact card and navigate to the History tab. The tab defaults to displaying all the fields.
- Select the fields you wish to view through the Field Chooser
 in the top left corner of the History tab.
 - Click Export above the tab fields to export the information to an excel sheet.

Note: The information here is read-only, meaning you won’t be able to override the field values. To edit the values, head to the itinerary.
Fields available through the History tab
We will briefly look at some of the critical fields available in the History tab.
- Itinerary ID: Lists the itineraries that the Contact is a part of. By default, the rows are sorted in ascending order of Itinerary IDs. To sort by a different field, click the field header. For further tips, refer to the Rearranging fields on Bookings tab article.
- Itinerary Display Name: The display name as entered in the itinerary.
- Itinerary Status: The status as displayed on itineraries. For instance, Quotation, Final or Canceled.
- Origin: Enlists the country in which the itinerary originated.
- Itinerary Agent: Displays the Agent assigned to the itinerary.
- Is Paying: Indicates whether the contact is a paying passenger for the itinerary.
- Passenger Amount: Displays the amount the contact owes for the itinerary.
- Passenger Status: This field correlates to the Passenger Status field in the Clients tab of the itinerary. You can select an optional status for a contact through a dropdown in the Clients tab. The values for the Passenger Status field can be populated on your Tourwriter Setup > General Lists > Passenger Status.


