Our Suite of Reports just got even better! We’ve added 4 shiny new downloadable reports designed to deliver business insights at the click of a button. Whether you love diving deep into data, or simply need a quick bird’s eye view of what’s happening at any given time – there’s a report to suit.
See below for more information and download links for each report. Important: After downloading is complete, follow the steps included below for uploading and branding your chosen report(s).
PAX Tracker
This report allows you to see a detailed summary of where your clients are at any given time. It displays the Itinerary Name, number of pax, and the Agent booked, as well as the Date, Time, Service Type, Supplier, City and Service booked. Filtering options include by Date, Service Type, Agent, Itinerary status, Booking status, Branch, Department and Country.
![]()
Supplier Purchases YTD
Reports on the Room Nights, Pax, Quantity and Payables you’ve booked at each supplier for the current and previous years. If Grade 2 has been completed in the Supplier record, it will display in the GROUP column. Filtering options include by Date, Service Type, Agent, Itinerary status, Booking status, Branch, Department and Country. 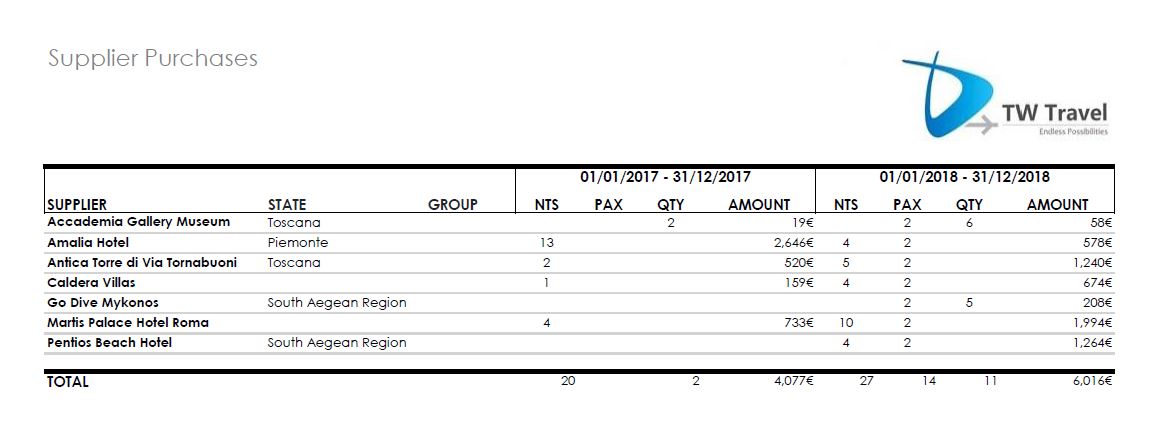
Download Supplier Purchases YTD
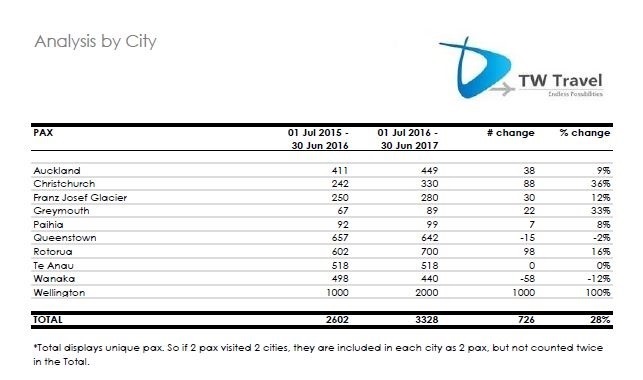
Analysis by City
Displays the Pax, Room Nights and Payables for your chosen date range and the same period last year. Filtering options include by Date, Agent, Itinerary status, Booking status, Branch, Department, Country and City.
Analysis by State
Displays the Pax, Room Nights and Payables for your chosen date range and the same period last year. Filtering options include by Date, Agent, Itinerary status, Booking status, Branch, Department and Country.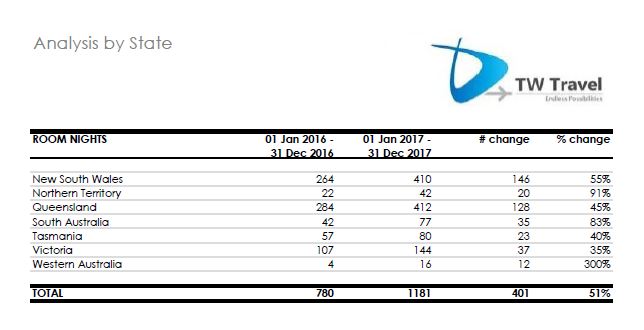
Adding a Report to Tourwriter
To add one of these reports to your Tourwriter Database for use, follow the below steps:
- Download any report by clicking on the download links above
- Save the report into your TourwriterData\Reports\General reports folder
- In Tourwriter, access the reports area by going to Tools > Additional > Reports, or click on the Additional menu in the bottom left corner, and select Reports
- Right click the Custom Folder
- Select Add report
- Browse to the .rdlc file saved in Step 2 above
- Click Open
- Save your changes
- Double click the file to generate the report
Any Custom Reports can be renamed by right clicking the report name, once you have added it to Tourwriter.
Options filter
Each report has the option of filtering the information to be displayed. Once you have run the report, click on the ![]() in the top right corner of the reports area, and deselect (untick) the options you do not require in your report. Click Run to refresh your results.
in the top right corner of the reports area, and deselect (untick) the options you do not require in your report. Click Run to refresh your results.
Displaying your logo
Our new Suite of Reports above also allows you to display your company logo in the top right corner. The logo must be attached to your Default Agent Label under Tools > Setup > Agent labels. Follow the steps below to brand your new report(s):
- Save your company logo in your TourwriterData\Images folder.
NB: The logo measurements should be around 7.5cm wide x 2.7cm high / 2.95 inches x 1.06 inches in order for the logo to appear right-aligned - In Tourwriter, go to Tools > Setup > Agent labels
- Highlight your Default Agent label
- Below, go to Voucher texts > Header sub tab
- Click on the folder icon
 and navigate to your company logo saved in Step 1.
 - Save your changes
- Back under Tools > Additional > Reports, double click the file to generate the report
Other Tourwriter Reports
There are plenty more Tourwriter Reports for you to explore, so take the time to review the Reports section on our Knowledge Base.